It’s time to strike a welding arc, destroy sawzall blades, rip out an entire camper floor, run 0/4 gauge, and lay some serious glass. Ten Mega Mods take on the 10X10.
Image may be NSFW.
Clik here to view.
Welcome to the third 10X10 Mod Tournament. Please review the following ten mega mods and vote for your favorite. We will announce the winner next week. For more information about the 10X10 Mod Tournament, including how to enter, click here.
Click here to vote for your favorite 3 mods from this month’s contest.
1. John Caliri, Carthage, North Carolina
Bumper Swing-Out Compressor Refrigerator Rack
2003 Toyota Tundra
2008 Northstar MC600
We bought our 2008 Northstar MC600 pop-up camper a couple months ago. The MC600 is a very small and light weight pop-up camper, which we needed for our 2008 Toyota Tundra.
Image may be NSFW.
Clik here to view.
We have an IndelB DC compressor refrigerator that we have used for the past several years. I love the convenience and easy of use of the compressor refrigerator.
The limitation of the MC600 is interior space. The IndelB refrigerator took up the entire hallway. I wanted to use the refrigerator, but I did not want o lose the interior space.
I have been a life long Jeep driver. I recently sold my last Jeep (Ha Ha! If you’re a Jeeper, you know what I mean). Among the scrap pile of leftover Jeep modification parts, I had an older rear bumper, and a spare tire carrier swing-out from Big Daddy Off-Road. These were essential to my planned modification.
Image may be NSFW.
Clik here to view.
First, I cut off the mounting points from the bumper and welded a piece of 2-inch square tube to the front of the bumper. The welded square tube is located right in the center; directly in front of the 2-inch receiver from the bumper part of the swing-out. This then fits into the 2-inch receiver of the truck and is secured with a hitch pin.
Second, I welded a 2.5-inch square tube to the swing-out part of the assembly. This acts as the receiver for the platform that hold the refrigerator.
Third, I found a platform frame at Tractor Supply designed to fit into a 2-inch receiver. The best part of this step was that the framework was in the clearance section at Tractor Supply for $10.
Next it needed a plywood platform attached to it. I cut a piece of exterior 3/4-inch plywood to fit the platform and the refrigerator. Then I painted and mounted it. The platform slides into the square 2.5-inch receiver on the swing out and is secured by a bolt.
A few years ago I picked up a mounting kit for a Yeti Cooler. The kit is just some screws, brackets and cinch straps. I found the kit at an off-road gathering in a vendor’s clearance box for $20. The kit will hold the IndelB refrigerator to the platform.
I had already modified this particular swing-out to carry a bike rack and, with the addition of some additional tubing, I can still use it to carry our bikes.
For powering the refrigerator, I added a fused Blue Sea System 12-volt receptacle to the rear bumper. This is powered by the truck battery. We use this connection while underway. While in camp I have a fused 12-volt receptacle connected directly to the house battery on the camper. This allows us to leave the truck battery fresh for starting duties, instead of draining it down at camp.
We have one trip under our belt with this modification. We camped for ten days and 1,791 miles in North Carolina, South Carolina, and Georgia. During this adventure, the modification met our entire objective. The bumper swing-out allows us to swing the platform and refrigerator assembly (and bikes) out of the doorway. The electrical set up ensures that the truck battery will be ready for starting when needed.
The bumper part of the assembly also makes for a great step into the camper. It is good for short stops when we are not going to use our scissor steps.
Image may be NSFW.
Clik here to view.
The only drawback is that the assembly is heavy making it difficult to put on and off the truck. A lighter version could be made from a lighter duty swing-out, but this is what we had laying around.
Image may be NSFW.
Clik here to view.
It took me five hours to complete this modification and only cost me only $30; due to my pile of spare parts. I estimate you could do this for around $500 if you bought components and did the work yourself. In my opinion, the skill level of this modification is hard.
2. Ron Richardson, Costa Mesa, California
Fiberglass Storage Bumper With Generator Storage
2014 Ram 3500
2012 Wolf Creek 850
As a family of four with a dog, storage in a concern. After seeing some of the storage bumpers that Torklift was manufacturing, I decided to make my own.
I do not have the aluminum welding skills that Torklift has, so I made my bumper out of fiberglass. Prior to making the bumper, my fiberglass experience was limited to part jobs from many years ago.
Before I started, I did research with YouTube videos, and jumped in. I was only building one bumper, so I did not need a mold. Instead, a light weight wood frame was built out of ¼-inch plywood and 1.5 by 1.5-inch framing.
The fiberglass would be laid directly onto the wood framing. My research showed that fiberglass does not like sharp edges or corners, so the 1.5 by 1.5-inch pieces would need profiles. Seven profiles were made in total so that the fiberglass could adhere to the wood frame.
Image may be NSFW.
Clik here to view.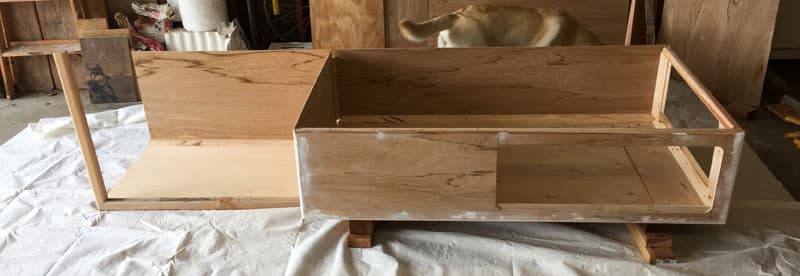
Above: This photograph shows the wood frame before fiberglass was applied.
Image may be NSFW.
Clik here to view.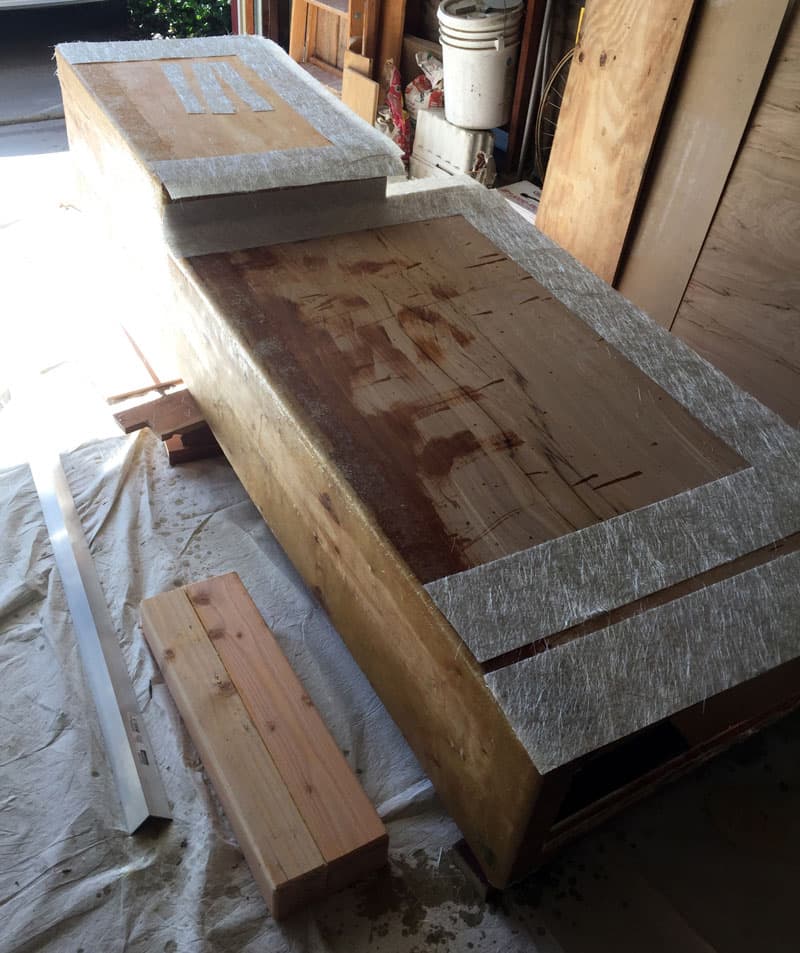
Above: Here you see the bottom of the storage bumper. A fiberglass mat was applied to the corners and edges. Woven fiberglass was applied to the body.
Image may be NSFW.
Clik here to view.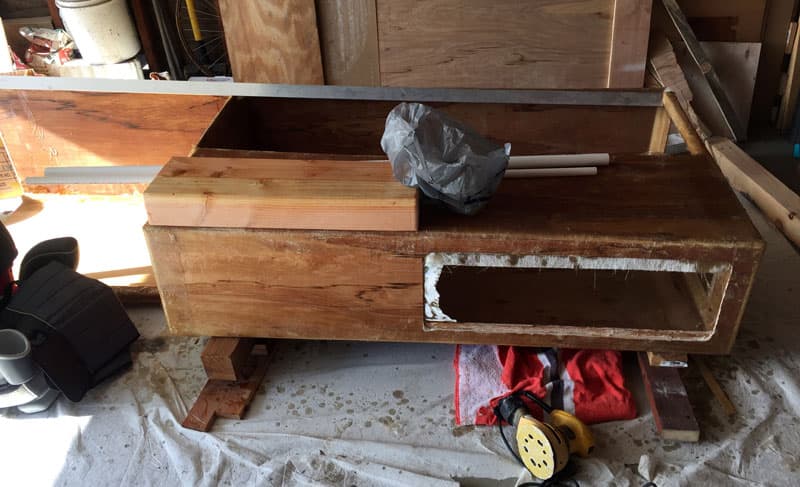
Above: Clear fiberglass before it was trimmed.
Image may be NSFW.
Clik here to view.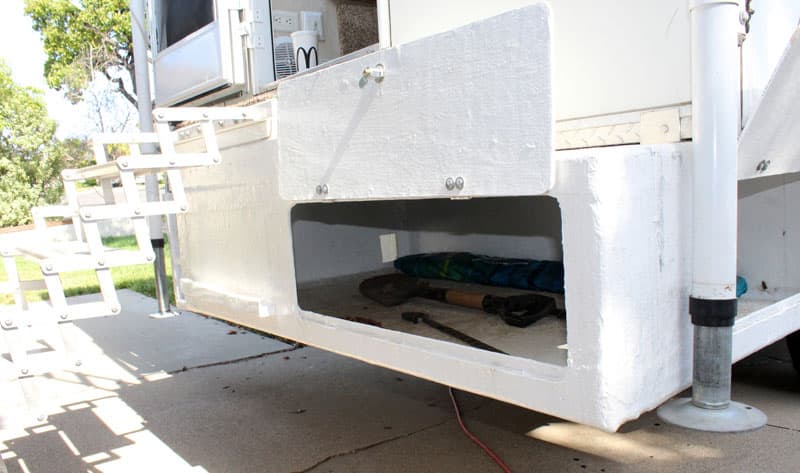
Above: White gel coat was applied and the box was mounted to the overhang of the camper.
Image may be NSFW.
Clik here to view.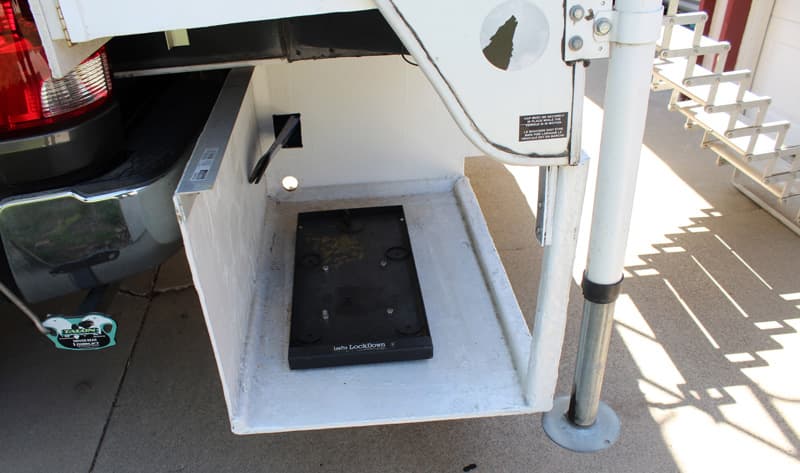
Above: I created a space for the generator.
Image may be NSFW.
Clik here to view.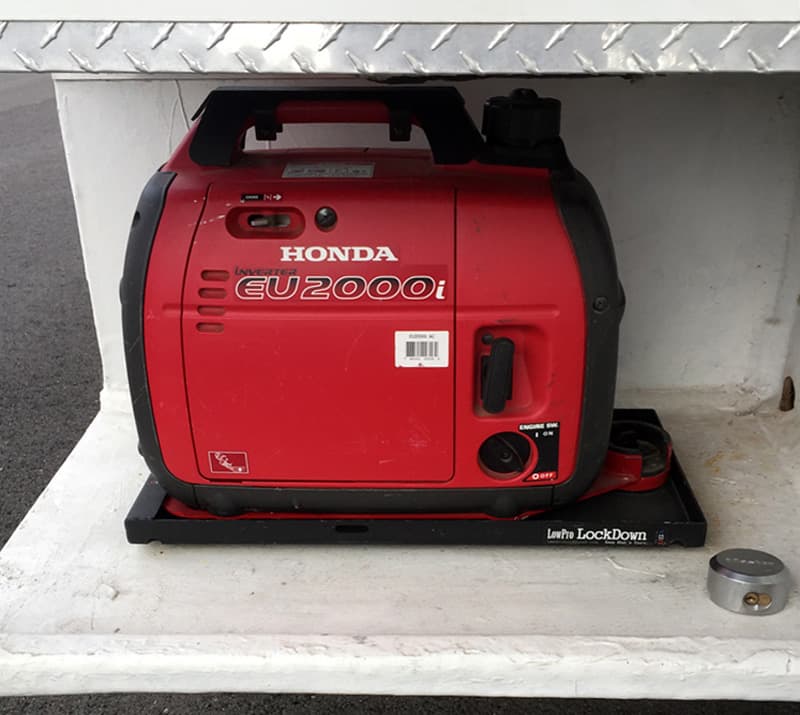
The generator is locked down with LowPro LockDown and a chain connected to the trailer hitch.
Image may be NSFW.
Clik here to view.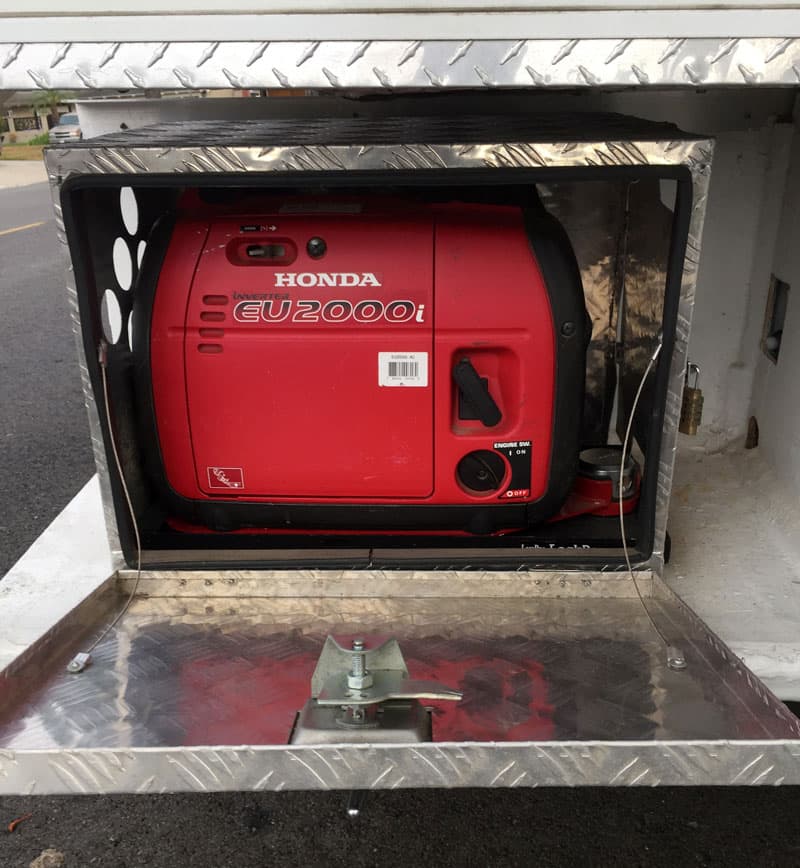
It is covered with a modified aluminum box.
Image may be NSFW.
Clik here to view.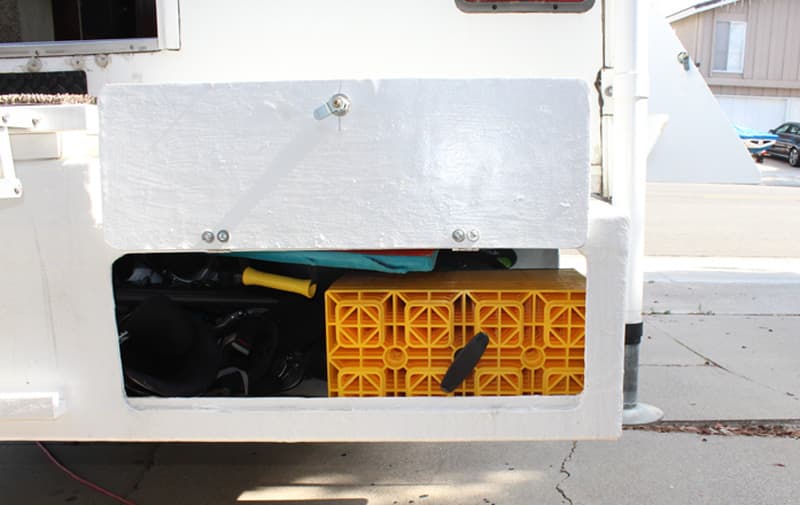
Above: Storage is accessed from the rear and side of the box.
Image may be NSFW.
Clik here to view.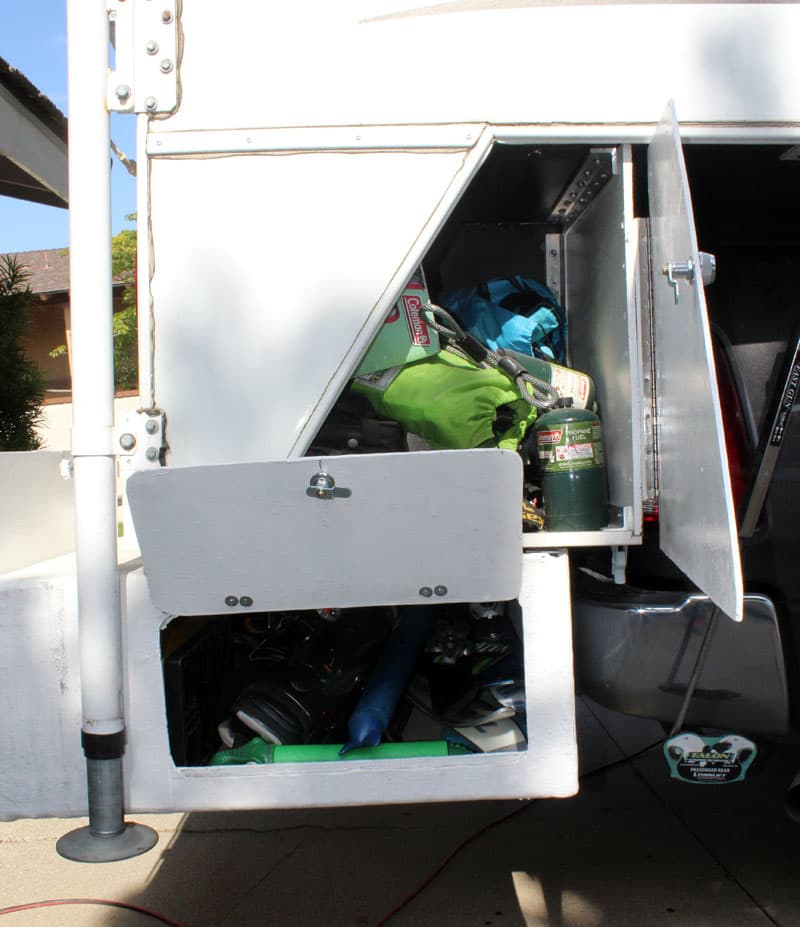
Also, storage compartments were created under the wings of the camper.
Image may be NSFW.
Clik here to view.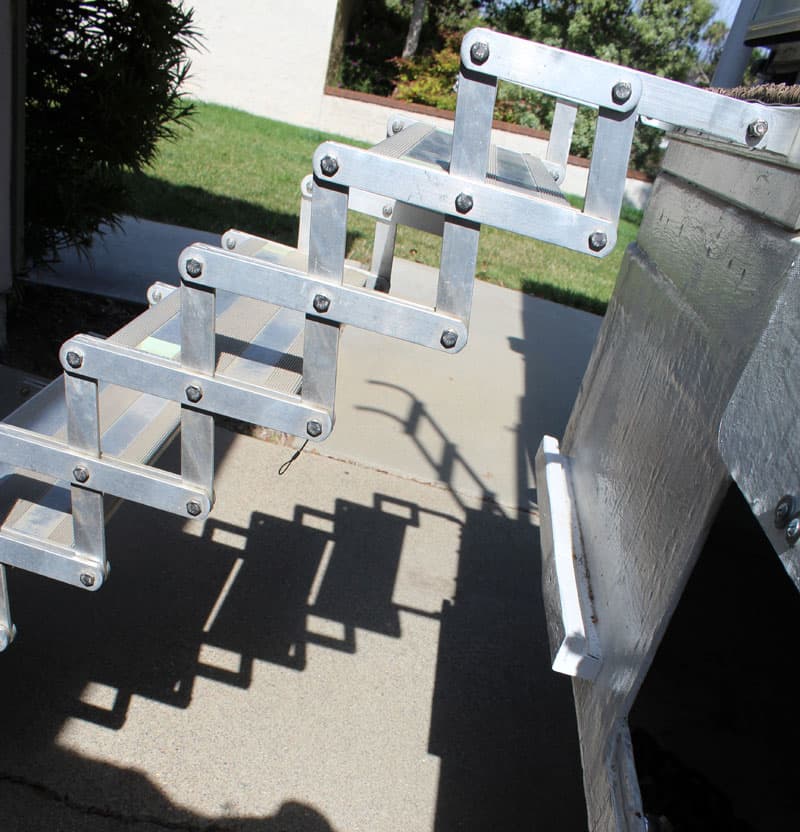
Above: Torklift stairs were mounted to the box.
Image may be NSFW.
Clik here to view.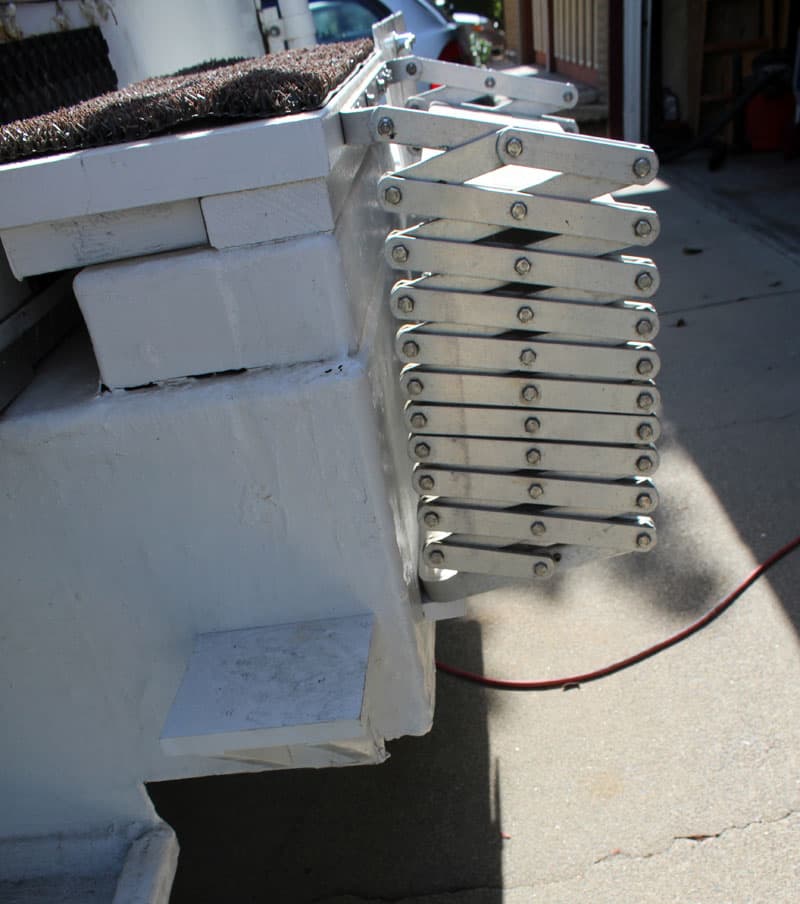
Above: This photograph shows the stairs in the collapsed position. The top stair on the bumper has a RV rug for wiping our feet.
Image may be NSFW.
Clik here to view.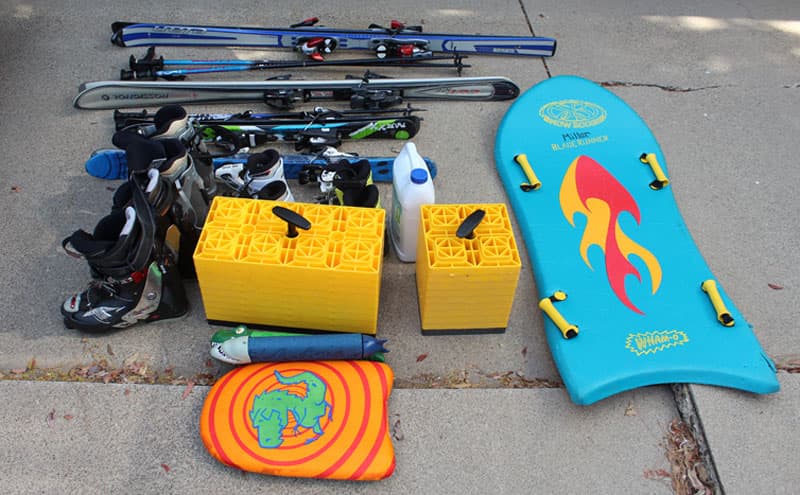
Above: Some of the stuff we keep in the storage bumper.
The storage bumper has worked out great for us. We now have a place to store outside stuff. The only thing I would change is the location of the generator. Where it is allows for a 16-percent grade difference before it will hit the ground. I would like it higher to create more ground clearance.
This project is hard. It requires design, wood working, fiberglass, and general construction. It took two months to complete with over 100 hours.
The materials for the storage bumper cost $600. We already had the Torklift stairs and the generator locking system (without generator) cost $300.
3. John Doyle, New Lowell, Ontario
Complete Remodeling of Okanagan Camper
2017 Chevrolet Silverado 1500
1996 Okanagan 80W
Image may be NSFW.
Clik here to view.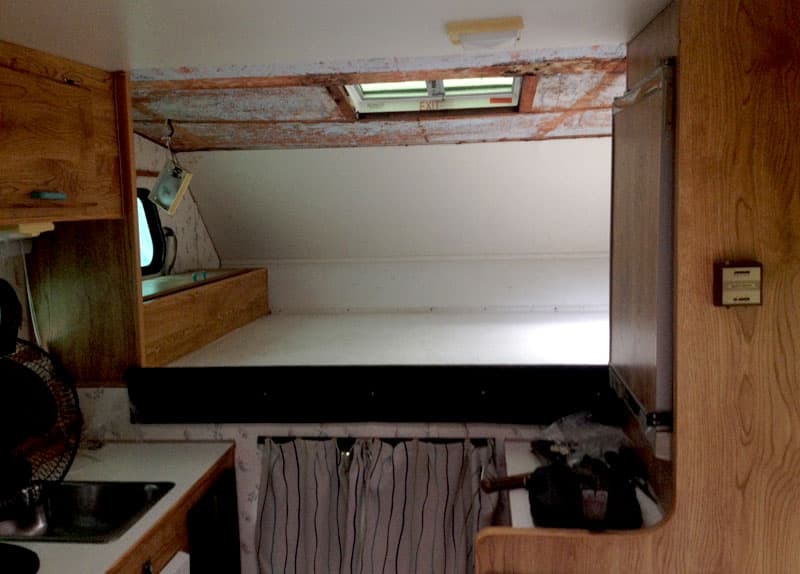
The idea of buying a truck camper occurred when I researched ways to travel affordably. Since I already had the truck, my uncle and I figured a truck camper would be the perfect solution.
Image may be NSFW.
Clik here to view.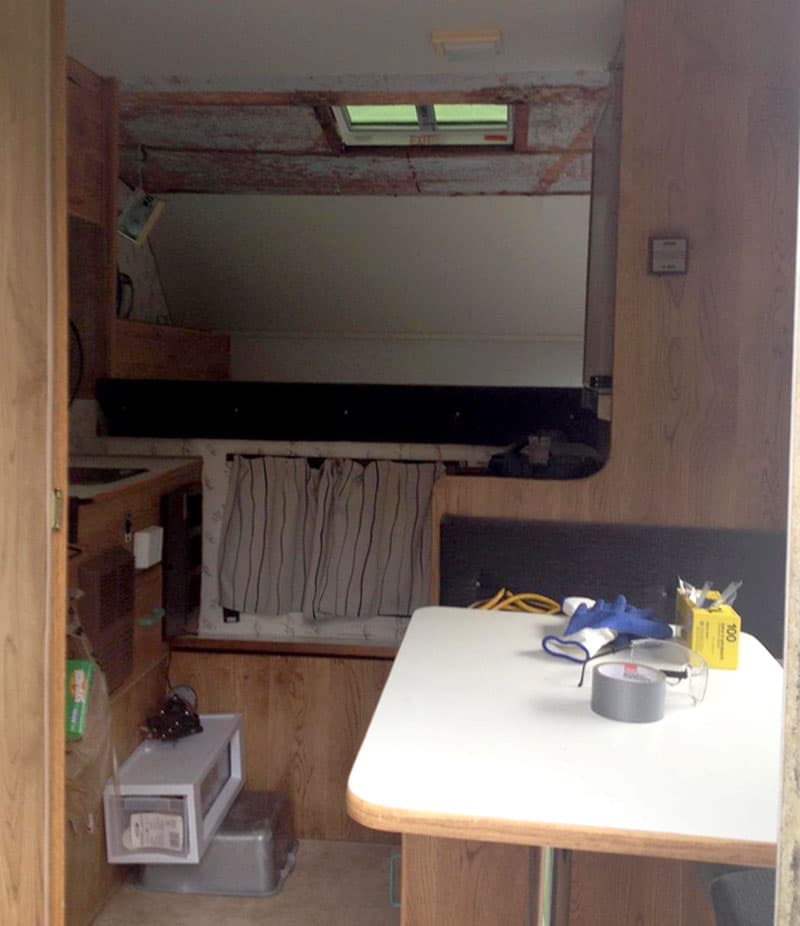
I purchased a 1996 Okanagan 8-foot truck camper with a 1,521-pound dry weight. My modification was designed to make this camper a home away from home while I explored Canada for the duration of 2018.
Image may be NSFW.
Clik here to view.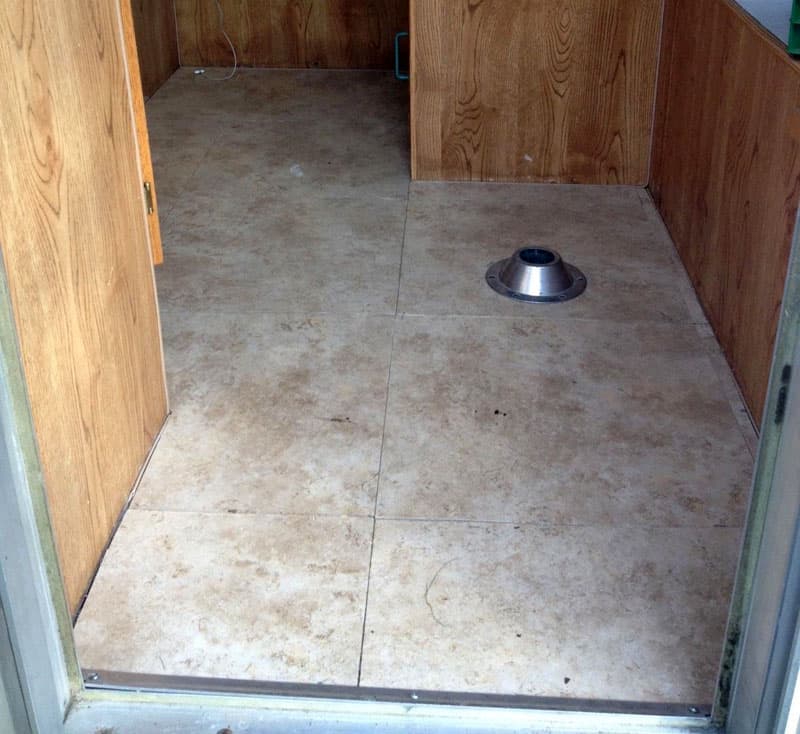
Apart from the needed repairs, I wanted an updated modern look with a unique cabin feel on the inside. I also wanted to keep some of the original features that the truck camper had to offer. So, an interior remodel was in order.
Image may be NSFW.
Clik here to view.
We gutted the interior down to the insulation and installed knotty pine wood paneling through the bedroom and living room area.
Image may be NSFW.
Clik here to view.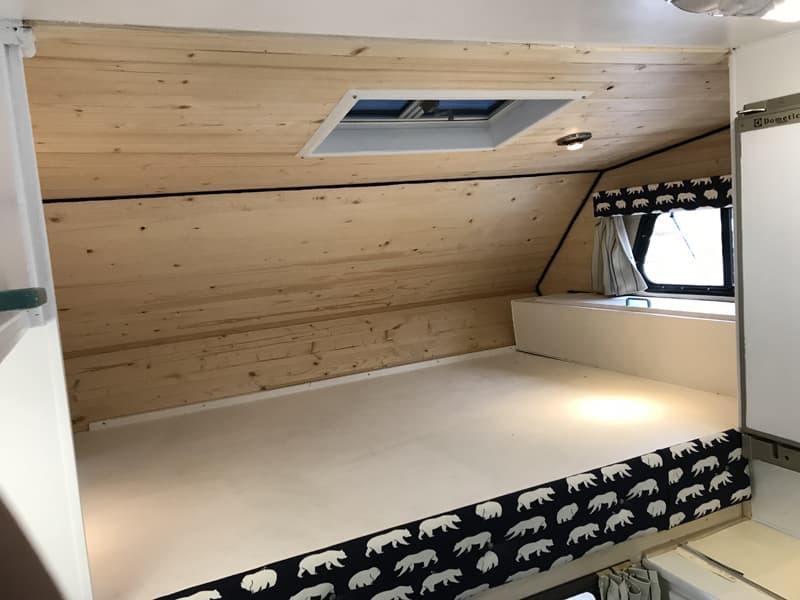
Instead of traditional wood trim in the bedroom area we used nautical rope to give it the cottage feel I was looking for. We also added LED lighting.
Image may be NSFW.
Clik here to view.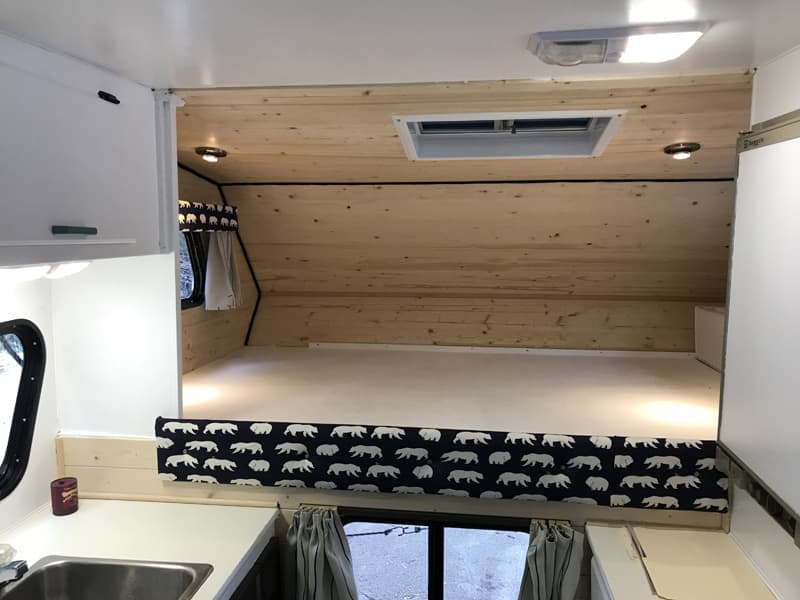
We ripped the old linoleum flooring out and replaced it with a new rubber membrane floor. It has a natural stone pattern that I complimented with a grey-white carpet.
Image may be NSFW.
Clik here to view.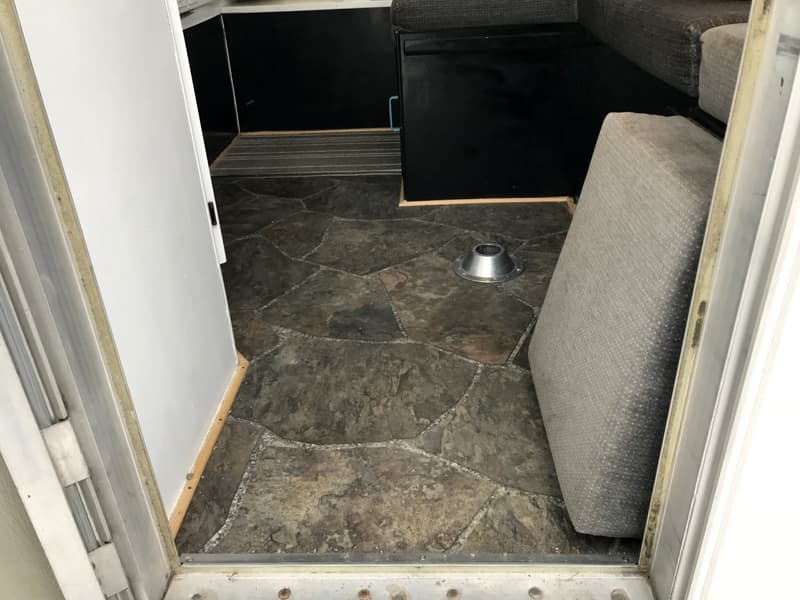
The wallpaper in the kitchen was removed and replaced with a white eggshell paint.
Image may be NSFW.
Clik here to view.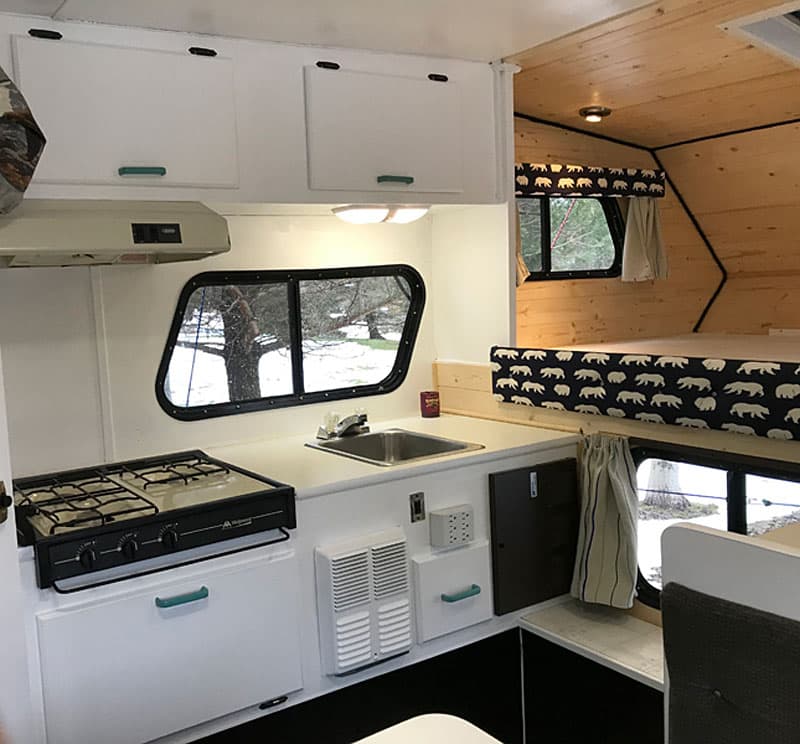
Last but not least, the valances were redone with new fabric.
Image may be NSFW.
Clik here to view.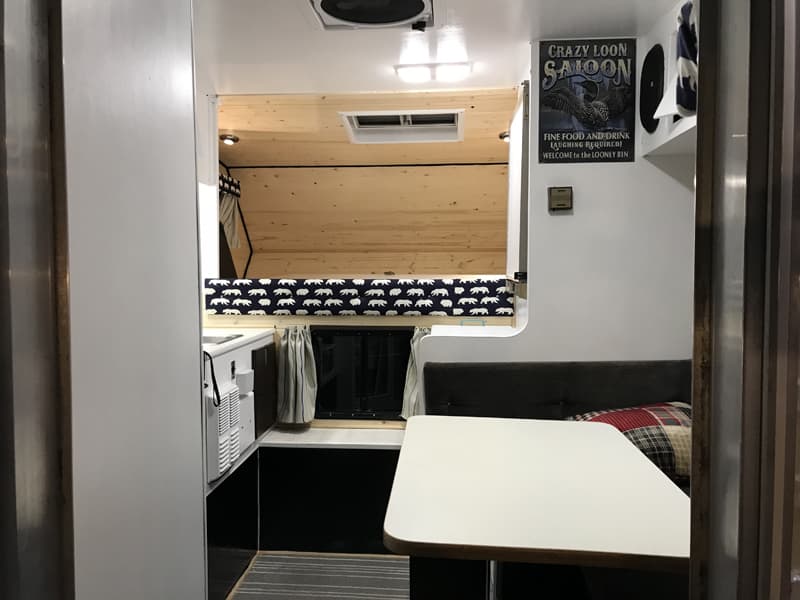
I also had to do a few repairs. Two of the three roof vents were leaking which caused significant water damage in the front cab over area of the camper. To fix this, we took the original vents out, resealed them with butyl tape, and installed new vents. One of the vents was a new Maxxair 5100K 10-speed intake/exhaust fan.
After that, a rubber roof was installed along with re-caulking the windows and lights. This made the exterior of the camper water tight.
Moving onto the inside of the camper we were able to salvage some of the appliances including the Wedgewood oven and cook top, Dometic three-way refrigerator, and the original Hydroflame furnace. They all required maintenance and a proper cleaning.
After careful consideration, we decided to seal off the black water holding tank and install a new Dometic 975 series toilet in the bathroom to add convenience.
The remodel worked out better than I had ever imagined! I enjoyed the truck camper as I went out camping this past weekend, but will unfortunately have to wait for winter to pass to try everything out.
It took me approximately 200 hours to complete this modification and cost me $2,580.56. In my opinion, the skill level of this modification is medium.
4. Paul Karlson, Bayshore, New York
Exterior Storage for Generator, Gear, and Portable Barbecue
2012 Dodge Ram 3500
2018 Palomino SS-1500
Image may be NSFW.
Clik here to view.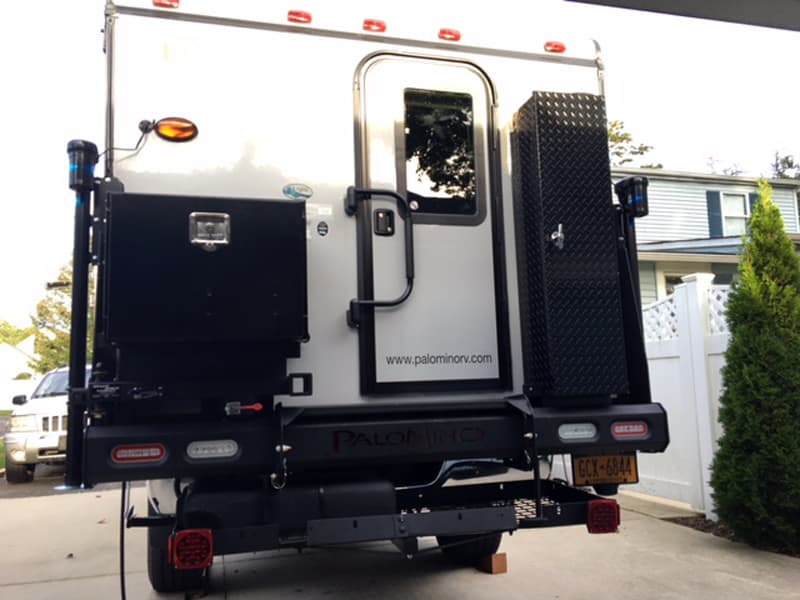
I did this modification because I wanted extra storage in my camper. I needed room for a portable generator for the air conditioner to operate and a place to put wet waders, rain gear boots, and a portable barbecue.
Image may be NSFW.
Clik here to view.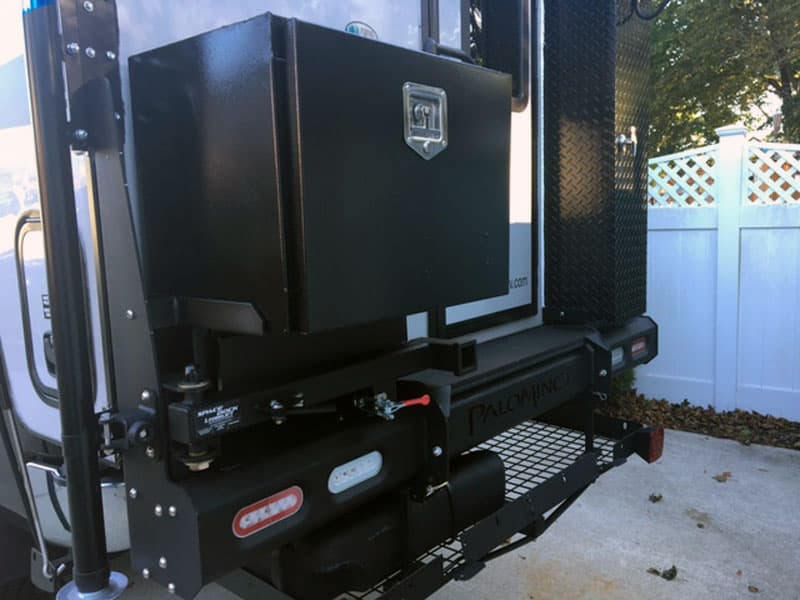
I wanted a steel lockable box for my 2,000-watt generator. Measurements taken, I found a store-bought box. I had steel laying around from years of working on cars and trucks. So all of the metal was on hand, but the steel probably would have cost about $100 had I bought it new.
Image may be NSFW.
Clik here to view.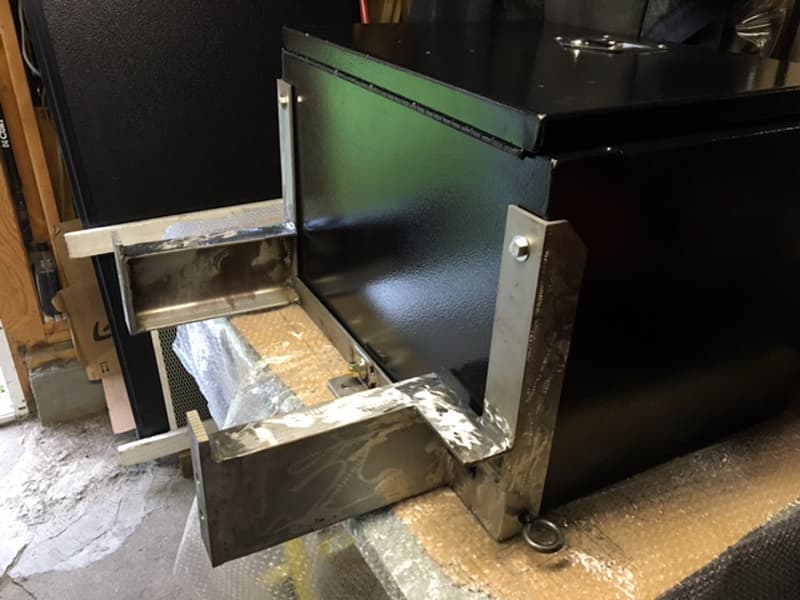
I welded support brackets to be mounted onto the rear bumper of the camper. I did not want to mount or drill into the back wall of my camper, but I had to drill one 3/8-inch hole for the aluminum wet gear box on right side. All other holes were drilled into the rear aluminum bumper itself using stainless hardware.
Image may be NSFW.
Clik here to view.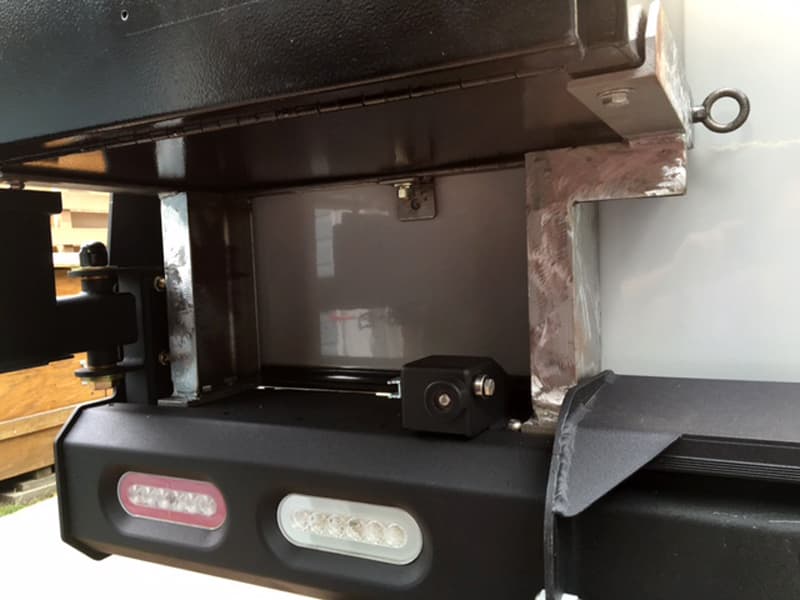
The total weight is 255-pounds including the rear Torklift bumper. The brackets I made are all steel, 1/4-inch thick, and welded. They are bolted to the storage boxes and to the bumper. I had all the brackets I made professionally powder coated black to match the bumper. I installed large hooks on the outside of the wet gear box as well as one fishing rod holder on the barbecue box.
Image may be NSFW.
Clik here to view.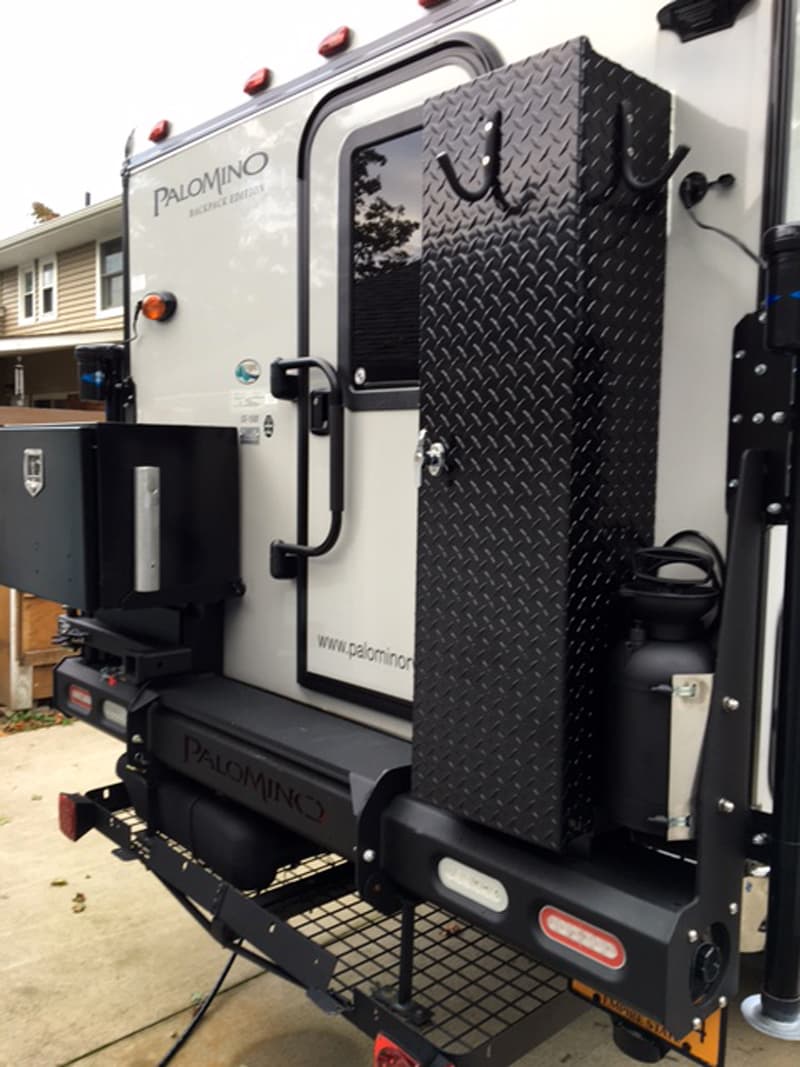
It actually worked out better then I thought.
Image may be NSFW.
Clik here to view.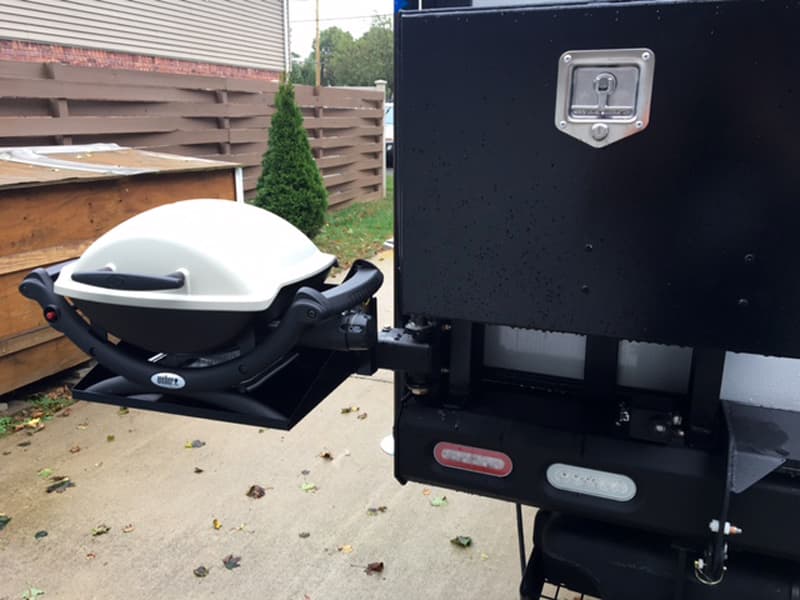
I now keep the barbecue in the steel box when I’m not using the generator.
Image may be NSFW.
Clik here to view.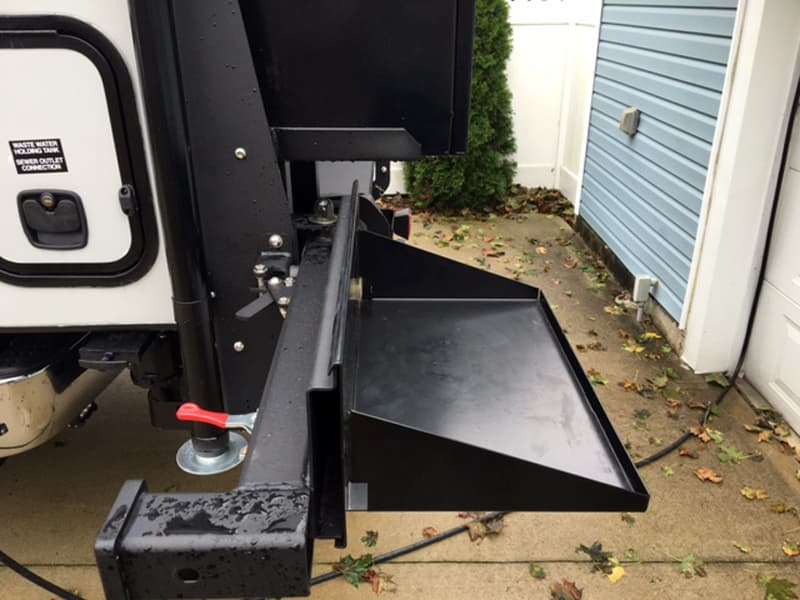
I do not run the generator inside this box. I still need to make a shelf for the generator to go into the Torklift Space Dock.
Image may be NSFW.
Clik here to view.
I scuba dive on a regular basis in the summer. I made a dive tank fixture to hold the tank when donning and doffing the dive tank. This also slides into the Space Dock. So far it has worked out great and I love it.
Image may be NSFW.
Clik here to view.
It took me probably 20 hours to fabricate everything; cutting metal, drilling metal, welding, and grinding. It cost me $375 all for the powder coating. In my opinion, the skill level of this modification is medium to hard because of welding and using a band saw and drill press.
5. Charles Coushaine, Punta Gorda, Florida
3000-Watt Pure Sine Inverter Installation
2001 Ford F350
2012 Chalet DS116RB
We dry camp or boondock about 80-percent of the time. While dry camping, we could not use any of our 110-volt appliances like the toaster oven, microwave oven, or hair dryer unless we ran our generator, which we don’t like doing for many reasons (carbon footprint, cost, noise, smell, etc).
Image may be NSFW.
Clik here to view.
Since we already had two 150-watt solar panels on our roof, we wanted to take more advantage of these green energy solutions. Adding the inverter and an additional battery seemed to fit the bill perfectly.
In the video above, I show the final installation of a 3000-watt pure sine inverter into my truck camper.
Image may be NSFW.
Clik here to view.
We also added a third Group 27 AGM battery up front and ran 4/0 gauge cables to the back compartment where we mounted the 3,000-watt inverter. Finally, we mounted the outlet and remote switch to the island inside the camper.
Image may be NSFW.
Clik here to view.
Running the cables from the front compartment to the rear compartment was by far the most challenging part of the install. In addition, I had to make my own 4/0 cables with connectors which required buying welding cables and hydraulically crimping on the end connectors.
Image may be NSFW.
Clik here to view.
So far the inverter has worked out great! We can now use the toaster oven or microwave anytime we want and my wife can plan meals that are makable whether we are boondocking or in a campground plugged in. She can also now use her hair dryer anytime.
We removed our gas grill and all associated parts to save considerable weight. With our 3,000-watt inverter, we now barbecue on our electric griddle outside on the picnic table.
It took me twelve hours to complete this modification and cost me around $600. In my opinion, the skill level of this modification is hard or extremely hard.
6. Paul Dixon, Mt. Juliet, Tennessee
Custom Receiver Hitch For Steps, Porch, Storage, and Tie-Downs
2013 Ford F150
2017 Eureka Camper
Image may be NSFW.
Clik here to view.
I would always forget to bring steps for my wife and I to get in and out of the camper. I also needed some extra storage space for a generator and fuel.
Image may be NSFW.
Clik here to view.
I made a custom receiver extension that doubles as a porch as well as tie-downs for the camper. It turned out great and really helps the comfort level of using our camper.
Image may be NSFW.
Clik here to view.
It took me four hours to complete this modification and cost me $400. In my opinion, the skill level of this modification is medium.
7. Peter Due, Brewster, Massachusetts
Removed and Rebuilt Camper’s Structure and Floor
2012 GMC Sierra
1987 Real Lite
The back floor overhang on my camper was squishy. It looked like the back was sagging and the steps flexed a lot. My modification was designed to strengthen and improve the floor.
I removed and rebuilt the floor. I was surprised that the floor was only luan and insulation.
Image may be NSFW.
Clik here to view.
Above: I am adding some steel support for the part that overhangs the bed. I already beefed up the floor by adding 1/2” marine grade plywood, but thought a little extra support wouldn’t hurt and it only added about 40 pounds.
Image may be NSFW.
Clik here to view.
Above: I added a little more steel so the steps would not be bolted through the floor. They don’t flex now. They are solid as a rock.
Image may be NSFW.
Clik here to view.
Above: Adding the 1/2” plywood only allowed 1/2” rigid insulation plus some bubble foil insulation under it. I was amazed the old floor was 1” rigid insulation with luan plywood on both sides plus the aluminum bottom.
Image may be NSFW.
Clik here to view.
The new floor is 1/2-inch marine grade plywood, 1/2-inch hard insulation with bubble foil, and topped with luan. I painted the bottom with floor paint instead of putting the tin back on. I think this will work.
Image may be NSFW.
Clik here to view.
The biggest part of this modification is that I added 3/4-inch trim board in the floor in stress areas. I also ran 1/4-inch x 3/4-inch flat steel down the length of the camper and welded cross members in the overhang section to support the steps and overhang.
Image may be NSFW.
Clik here to view.
The new floor has worked great! The floor is solid even on the stands. When I raise up the camper there is no more creaking or heavy swaying.
Image may be NSFW.
Clik here to view.
Above: I didn’t put the aluminum floor cover back on. It really held a lot of moisture. This is painted with cement floor paint. I use it for the side boards on my dump trucks and it holds up quite well. I think this will work fine.
It took me 32 hours to complete this modification and cost me $1,700. In my opinion, the skill level of this modification is hard.
8. Dennis Nord, Santa Barbara, California
Exterior Step System Using Tool Box and Brophy Two-Step
2005 Chevy 2500
2004 Northern Lite 9.6
Image may be NSFW.
Clik here to view.
I started with a Brophy two-step and added 8-inches to the receiver bar. I then added a third step on a removable steel post. In the photo you can see the nut that tightens the third step post to the other two.
Image may be NSFW.
Clik here to view.
I also made the tool box a step with 5.5-inch porch. It is permanently attached. The result is that we have four steps. Each step is 10-inches above the next before we land in the truck camper.
We also carry an adjustable little step for those times when the backend is on blocks and, therefore, even higher. From the usual flat parking space, our back door is 44-inches higher, so this gets all the steps to manageable size.
Image may be NSFW.
Clik here to view.
The banister is from Torklift. It’s a great stabilizer for the long rise. It is on an L-bracket that swivels so the broken down unit (removing step 3) fits inside the tool box. It’s fast to assemble and easy to put away. I use a little receiver Wobble Stopper to keep the modified Brophy steps from wobbling too much.
Image may be NSFW.
Clik here to view.
The Brophy steps were $76. The welding I had done by someone else. The box was made out of materials we had lying about plus a little stain. That was a pair of 2x6s cut to 4.5-inches plus the 1-inch plastic lumber I had left from the deck. For one who welds, this would be easy.
9. David Jolly, Allen, Texas
Diamond Plate Installation On Under Body of Camper
2012 Toyota Tundra
2009 Phoenix Camper
The marine-grade plywood on my camper was starting to lose its waterproof qualities. To solve this, I decided to skin the lower half of my camper with diamond plate for durability and water resistance.
Once I started looking at the cost of diamond plate, it was just out of my budget. Even super thin crappy stuff at Home Depot was $80 for a tiny 4-foot piece.
Image may be NSFW.
Clik here to view.
That’s when I scoped my favorite place; good ol’ Craigslist. I found someone selling a 7-foot x 2-foot x 18-inch truck box made from super thick, but lightweight diamond plate aluminum for $80! I thought to myself, “I have a sawzall”. I asked if he would take $60 and he did.
Image may be NSFW.
Clik here to view.
After eight broken sawzall blades, I had it into enough pieces to cover most of the lower half of my rig.
Image may be NSFW.
Clik here to view.
I then trimmed it with new aluminum trim and re-caulked everything.
Image may be NSFW.
Clik here to view.
I am very happy with the way it turned out. With the new diamond plate, the camper should be much stronger and better protected.
Image may be NSFW.
Clik here to view.
I looked at the new Phoenix Campers and noticed that this is how they make them now. Next I am planning on adding an outdoor shower spout to the driver’s side portion that sticks out.
Image may be NSFW.
Clik here to view.
It took me 12 hours to complete this modification and cost me $150. In my opinion, the skill level of this modification is medium.
10. Scott Richards, Prince Rupert, British Columbia
Camper Step System To Use While Towing Boat
2015 Chevrolet 3500
2015 Adventurer 89RB
Image may be NSFW.
Clik here to view.
The primary reason we chose a truck camper was to tow our boat to Canada’s wealth of lakes and rivers. After our first trip across the four western provinces, we found accessing our camper difficult while the boat was hitched.
Image may be NSFW.
Clik here to view.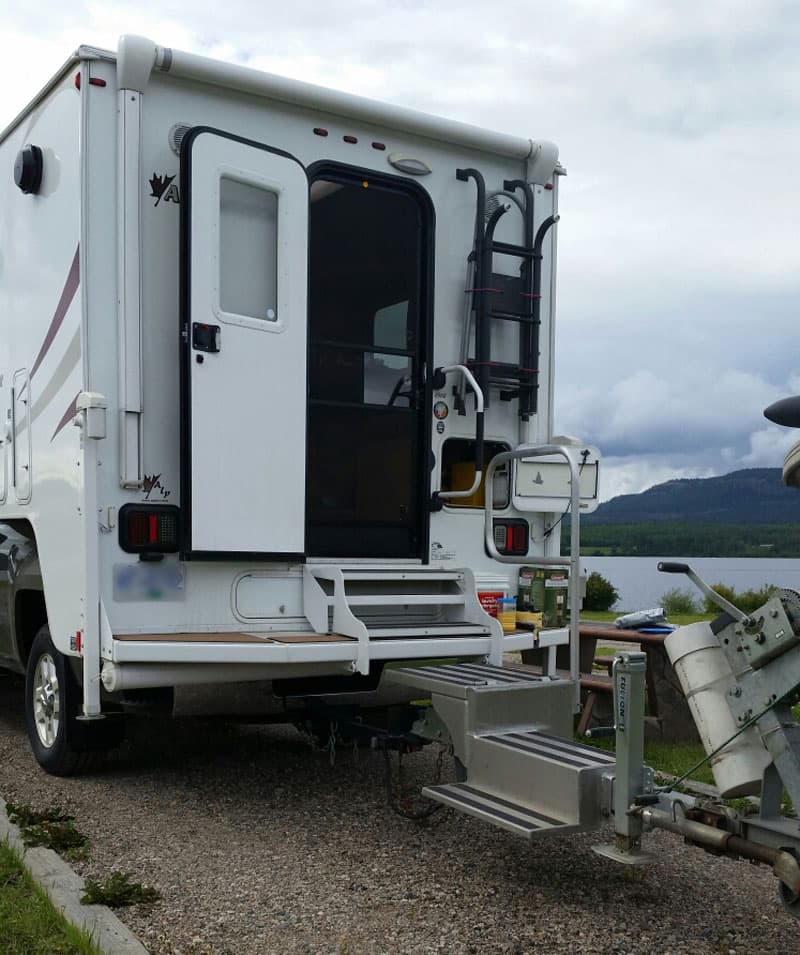
My modification is an access step system over my boat trailer. I designed what I needed and took it to a local fabricator for certified welding assistance. After six hours of building, we celebrated victory.
Image may be NSFW.
Clik here to view.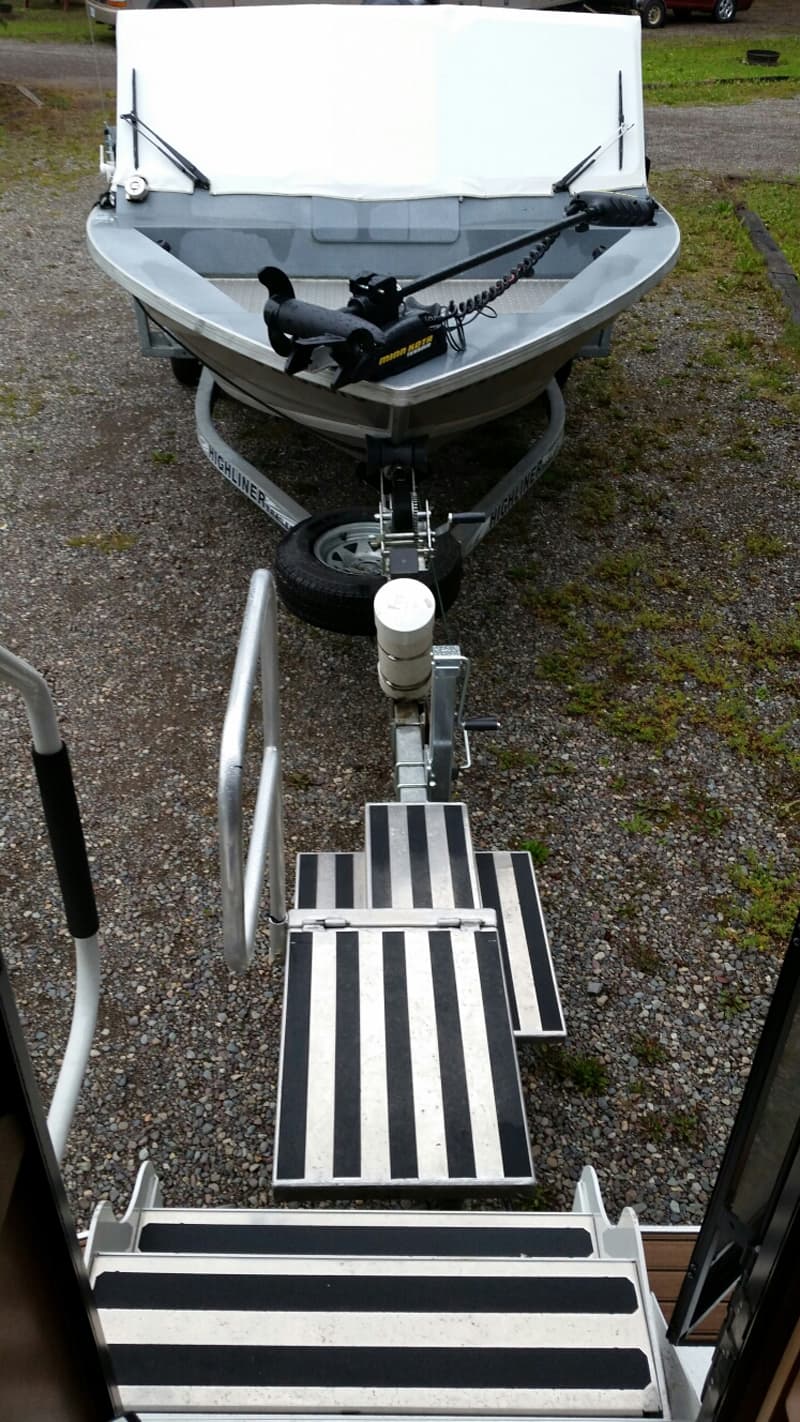
I am extremely satisfied with this modification. It took six hours to complete and cost $1,000 Canadian. In my opinion, the skill level of this modification is hard since you need certified metal fabrication skills.
Click here to vote for your favorite 3 mods from this month’s contest.
Disclaimer: The modifications above are submitted by Truck Camper Magazine readers. It is your responsibility to make sure that any do-it-yourself modification project you undertake is safe, effective, and legal for your situation.
Enter Your Mods Now!
If you’d like to enter a modification you’ve done on your truck camper, click here. You can enter as many mods as you want, at any time. Good luck mod makers!
The post 10X10 Mod Tournament 3: Mega Mods appeared first on Truck Camper Magazine.