See a Heki skylight replacement, extensive storage modifications, an intricate slide-out blocking system, and the world’s first truck camper catio. This Mod Contest is purrr-fect!

Welcome to the July 2017 Super Cup Monthly Mod Contest. Please review the following ten Medium Mods and vote for your favorite. We will announce the winner next week. If you’d like to enter mods into TCM’s Monthly Mod Contest, click here.
Click here to vote for your favorite 3 mods from this month’s contest.
1. Wanda and Keith Webb, Columbus, Texas
Wardrobe Closet With Drawers
2007 Chevy 3500
2009 Lance 981
The entire cabover closet in our camper was devoted to hanging storage. We don’t carry a lot of hanging clothes, so the cabover closet was being underutilized.
We wanted to use more of this space and free up other areas in the camper. To accomplish this, we came up with a sliding drawer area.

The goal was to take the existing closet and divide it into two areas; one for hanging clothes, and one for shelves that would allow for pull-out baskets. Ideally, the drawers and baskets would be easily accessible.
We determined the dimensions of the closet selves by the dimensions of the baskets we selected. After measuring the length, height, and depth of the available space, we started planning the rest of the project.
I started by removing the mirrored door of the wardrobe to make the area easier to access. You could probably do this modification with the doors in place. We also removed the clothes rod and hardware.

I used 3/8-inch plywood, however 1/2-inch plywood might have been a better option. I used 1 1/4-inch x 1 1/4-inch, eighth-inch thick aluminum angle.

I cut the aluminum angles and used two at the bottom to fasten the wall to the floor, and two at the top to fasten to the top of the closet. I used another aluminum angle to fasten to the back of the closet.

I then loosely placed all of the aluminum angles so I could fit them all in. I would tighten them after the install was further along. The aluminum angles are for the wire racks to sit on.

I cut the angle aluminum 2-inches shorter than I needed. This left a 1/2-inch gap to allow for the lip of the wire rack. This also keeps the wire rack from moving, and makes the drawers easier to remove.
Next I installed the wire shelving. I cut the wire shelving to the needed width. Home Depot had it in the proper depth already. The wire shelving had plenty of strength and stability.

For this project I used Pop-brand Jack Nut inserts. I used a 016-187 grip range with a 10-24 thread. Jacks Nuts feature a threaded insert that has to be used with a tool to set the Jack Nut, which is close to a Molly bolt in function.

That allows Jack Nuts to be fastened to thin walls. I found them at a fastener company like Fastenal.

I then cut the clothes rod to the new length and reattached it to the new wall using the same attachment piece that I took off.
Before starting the project, I recommend thinking about what you want to designate each shelf for and find the baskets ahead of time for planning. People should also consider the number of shelves they want.

I like the results. I wish the bottom basket was deeper because we keep dirty clothes in it, but it’s been great.
The project took me four hours, including staining the plywood. The materials cost $50. In my opinion, the skill level of this modification is hard. Sitting on the bed and building this in the cabover was tough. If you have issues with tight spaces, then it could be more difficult.
2. David Cox, Punta Gorda, Florida
Slide-Out Cat Blocker
2014 Ford F350
2014 Arctic Fox 990
A vexing problem we faced with our Arctic Fox 990 is that we wanted to travel with our two cats. While driving, keeping the cats in the back of our Ford F350 super cab was not a workable solution. They needed to get to their litter box as well as to water and food. There is not enough room in the truck for these items.
We have a pass-through donut between the cab and the camper so the cats are free to go between truck and camper to use the litter box, access food, and sleep.
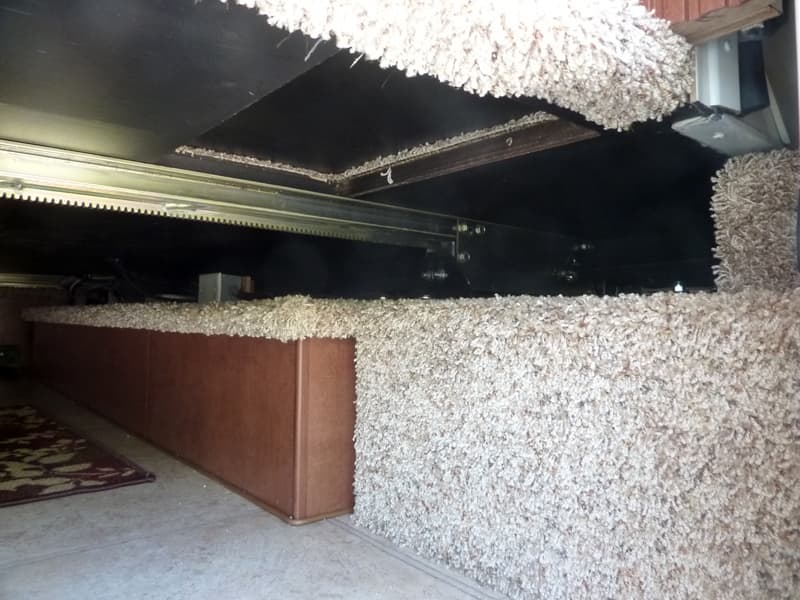
Above: The original slide-out before the cat blocker was installed, see the open gap where the slide mechanism is located
The problem we were having occurred when our slide-out was pulled in. Cats like to hide in small, dark spaces – like the ones created under the slide-out when it’s in.
We often pull over for lunch and open the slide-out. But, if the cats are underneath, that could be a problem. Unlike dogs, when you call cats, they just ignore you. So we were faced with the likelihood of not being able to open the dining area when we needed it. Or worse, sliding the room out and crushing the cats! That would not be good.
To solve this problem, I created a way to block the underside of the slide-out room when the slide-out was in.

Above: The cat blocker assembled, before it is installed in the camper’s slide
My design goals were (a) to prevent the cats from getting under the slide, (b) easy installation that takes under two minutes, (c) the ability to open the slide-out room partially without removing the blocker, and (d) the blocker is able to be stored in the truck when not installed.
The blocker is in three parts; left side, right side, and the center span between the two. The sides are custom fit since the openings are different.
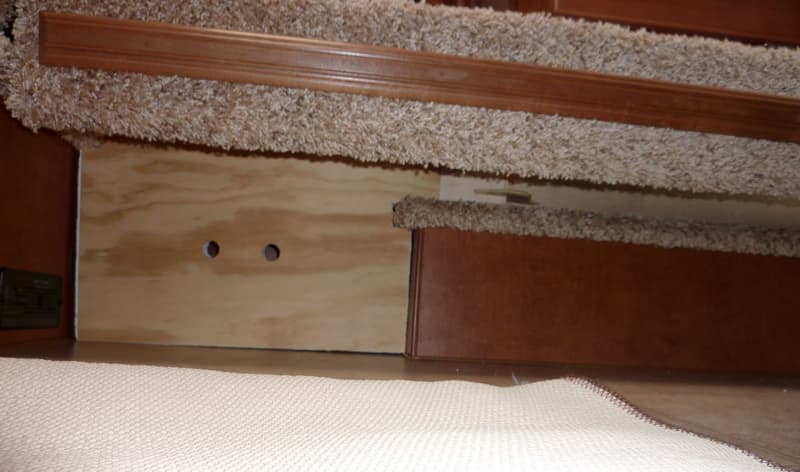
Above: Cat blocker, left side
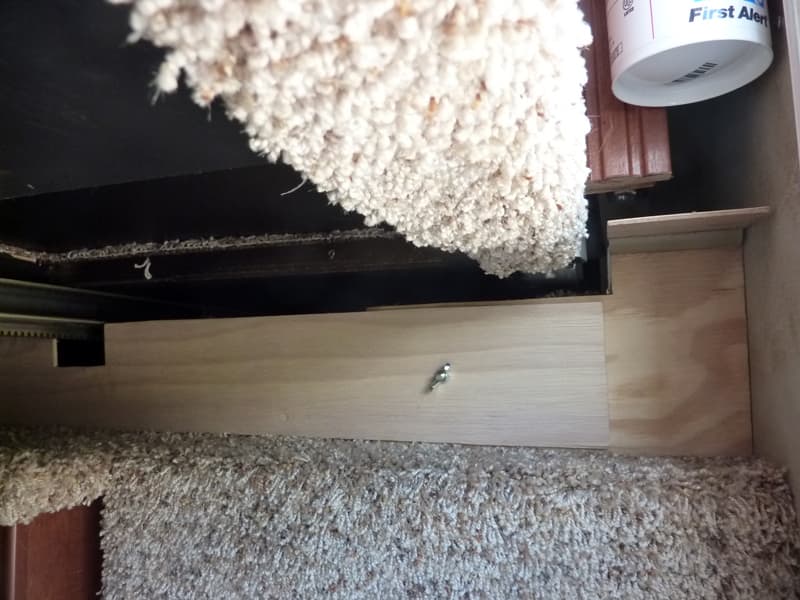
Above: Cat blocker, right side
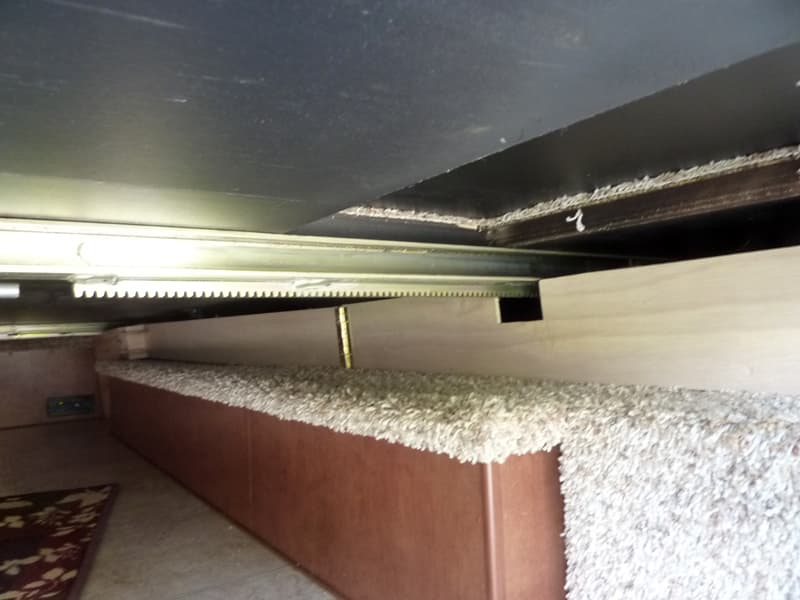
Above: Cat blocker, center
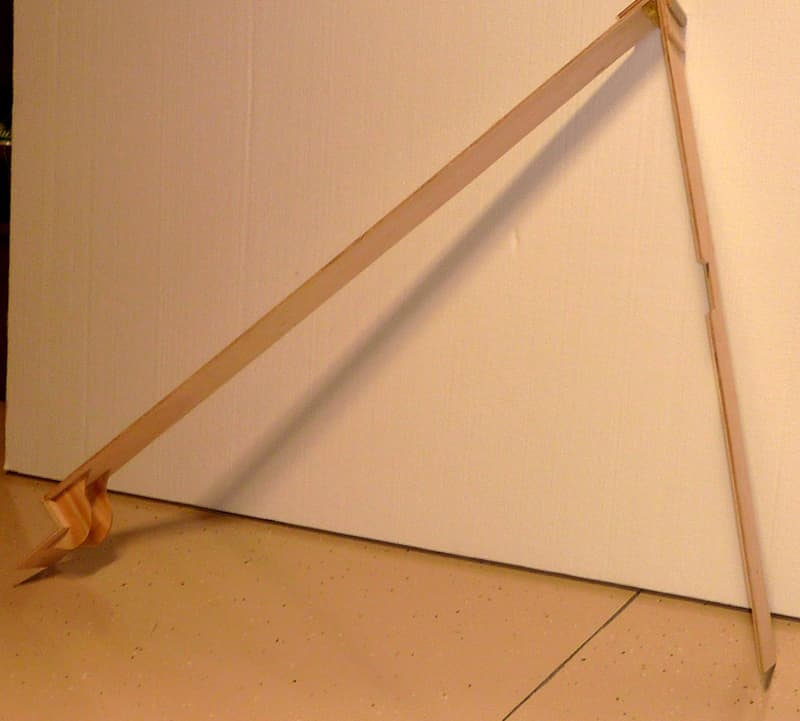
Above: Showing the hinge of the center span
The center span is hinged to facilitate storage. Two wing nuts are all that is needed to assemble the blocker.
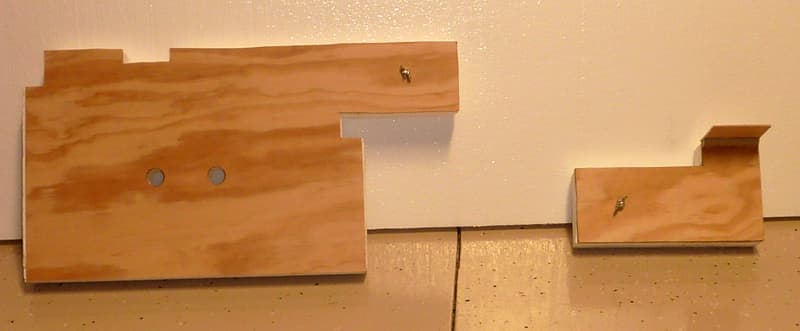
Above: Left and right pieces on their own
The left and right sides are ¼-inch plywood with 2-inch thick insulating Styrofoam backing for stability. The center span is ¼-inch plywood, hinged at the center.

Above: Center span on its own
The blocker works as planned. The blocker can be quickly installed by one person, but two make it easier.
The cats cannot get into the Netherlands under the slide-out and we can move the room out a foot or so to hop in for a quick lunch while the blocker is still in there.
The blocker took me eight hours to design, fabricate, tweak, redesign, etc. The materials cost me $20. In my opinion, the skill level of this modification is medium.
3. Bill Harr, Stockton, California
Indoor/Outdoor Thermometer
2005 Toyota Tundra
2013 FWC Hawk
I wanted an indoor/outdoor thermometer. Everyone needs to know the temperature before going out in the morning. It’s also nice to know how cold it is at night or how hot it is during the day.
I purchased an AcuRite indoor/outdoor thermometer model #00831A2. I liked that it had high and low outside temperature. You can change the time it resets for 24-hours by removing and replacing the batteries. I did this at 12 noon.

The inside read out is mounted next to my mirror at the rear of my camper. I made a holder for the outdoor sensor out of 2-inch PVC pipe. I cut, heat, and formed the PVC to a shape to hold the sensor.

Above: First try, AcuRite under the camper
I mounted the PVC under the side of the camper, which I thought was out of the rain. The sensor is all-weather, but driving in an Arkansas thunderstorm was a little more weather than it could take and it died. I really missed the outdoor temperature on our trip after it died.

Above: Second try, AcuRite under the door and in front of the license plate
So, I stopped at Walmart and got a new sensor. The second sure-not-to-fail idea was to put a hook under the door so the sensor was out of the weather. Furthermore, it was in front of the license plate where I was sure it would not be forgotten. If you see a sensor in Theodore Roosevelt National Park, let me know. It was on the hook when I left the campground.

Above: Third time’s a charm, AcuRite mounted inside propane compartment’s door
Third time is the charm. I moved the PVC mount to inside the propane compartment’s door. It is out of the weather and out of sight. It is next to the louvers so the temperature reading should be very close to outside temperature.

Above: Third time’s a charm, AcuRite mounted inside propane compartment’s door
The first location was fine until it wasn’t. The second location was fine until I forgot to bring it in. The third location of the sensor is working great and should continue to do so. Note that AcuRite now has a new model #02043 that has high and low for both inside and outside. It’s under $15 on Amazon.

There is no wiring for the PVC mount. Everything is wireless. The PVC was cut length wise, and heated with a plastic welder. Once the PVC is heated, it is very soft and hot, so wear leather gloves.
I made a flat sheet of PVC from the pipe, laid it over the sensor, and formed it to fit. The mount is the only thing that is extra work. Anyone handy could make it out of PVC or sheet aluminum. You just have to be sure no one makes a hole in the propane compartment; only the door.
It took me less than one hour, three times. It cost me under $20. In my opinion, the skill level of this modification is easy.
4. Mike Peebler, Cedar Rapids, Iowa
New Hatch In Cabover
2009 GMC 3500 HD
2002 Lance 1181
While on a trip to California last fall, our Heki II skylight blew off the top of our Lance 1181 in a stiff crosswind on I-80 just west of Salt Lake. Rather than put another Heki back in, which I felt would be just setting the table for another catastrophic failure, I refitted the Lance 1181 with a Heng’s escape hatch.
The existing roof opening for the for the Heki was approximately 37 1/4-inches by 25 3/4-inches. The Heng’s hatch ruff opening requirement was 25 1/2-inches by 25 1/2-inches. It was necessary to rebuild the opening to meet the requirements of the Heng’s 68631-C2.
After removing all of the Heki assembly that was left, I installed four pieces of 1 1/2-inch square steel tubing. Two are for mounting the new vent on. Then, there’s one on each end as an additional mounting surface for my interior and exterior roof material, which was 1/8-inch thick marine plywood.

The Heki had a built-in light, so I decided to mount two twelve-volt Acron 13813 30-watt fluorescent fixtures. I did that on each side of the hatch to keep the lighting feature. The light fixtures also help to hide the imperfections of my interior ceiling splice.

To complete the exterior roof, I used Dicor’s 4-inch wide DiSeal roll. Two strips are on each side of vent, slightly overlapping. I completed sealing the new vent with Dicor lap sealant.
So far our Heng hatch upgrade is working great. It’s been through a lot of Iowa’s weather already, which has included stiff winds. It is still there.
We really like the ease of use compared to the cumbersome operation of the Heki, not to mention this one keeps out mosquitoes.
We are surprised manufacturers haven’t offered something other that the Heki based on all of the online buzz about how poorly the Heki hatches hold up.
I’m slow, so it took me approximately fourteen hours to complete this modification and cost me around $500. In my opinion, the skill level of this modification is hard.
5. Larry Power, Kennewick, Washington
Installed LED sconces
2014 Ford F350
2009 Northland Polar 860
When we bought the camper, both the lights on our dinette and the head of the bed were old brass and way-too-bright mini-spotlights.

I removed them and installed LED sconces. They look good and the light emitted is perfect. We enjoy having the option of more subdued lighting in the evening. We have overhead lighting in case we need more.

It took me two hours to complete this modification and cost me $40. In my opinion, the skill level of this modification is medium.
6. Martin Spriggs, Calgary, Alberta
Storage Cage In Truck
2007 Ford Ranger
2014 Four Wheel Camper Eagle
Being an amateur wildlife photographer, speed and ease of access to photography equipment is a requirement when I pack my gear. Building a storage container purposely built with these requirements in mind seemed a logical step in the evolution of my truck camper.
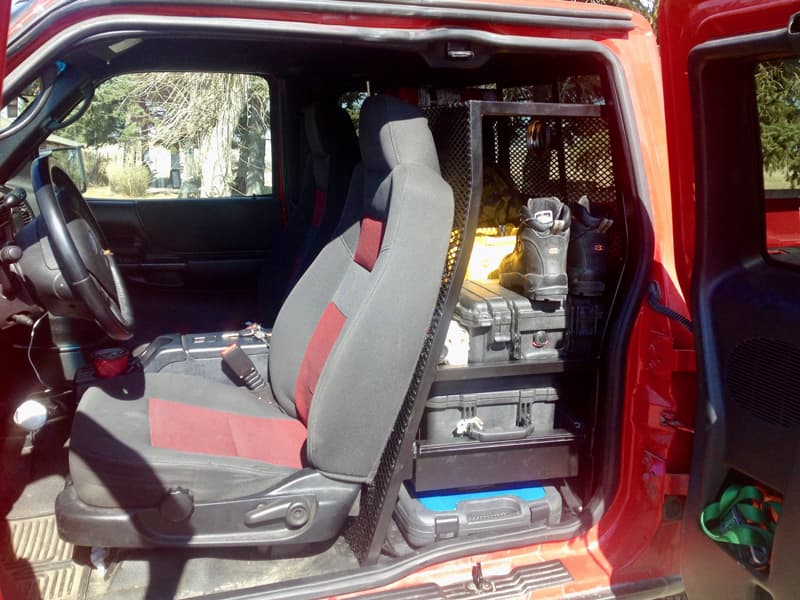
Small trucks have limitations when it comes to storage but, if you utilize space well, there is ample room to store equipment and gear. For example, the space behind the seats of an extended cab is well suited for storage purposes.
I designed and built a metal cage to house camera gear, road safety gear, and survival equipment – including winch accessories for my Ford Ranger. It’s not your average Ford Ranger, but that’s another story.
The cage is made from one-inch metal stock custom bent to align with the rise of the seat and fit the space in the extended cab behind the driver’s seat.
The stock fold up seats and tire jack mount were removed from the extended cab to maximize available space for the cage. The driver’s seat no longer leans back for a road side nap with the cage in place, but that’s not a problem because I have a Four Wheel Camper for that purpose.
The cage extends two-thirds of the way across the extended cab allowing for a fold-up kayak to be packed on the opposite end of the cage, behind the passenger’s seat. The cage is bolted to the floor of the truck and is enclosed on three sides and the top with wire mesh. All joints are welded. The cage is so solid that you can actually rock the truck by pushing and pulling the cage.
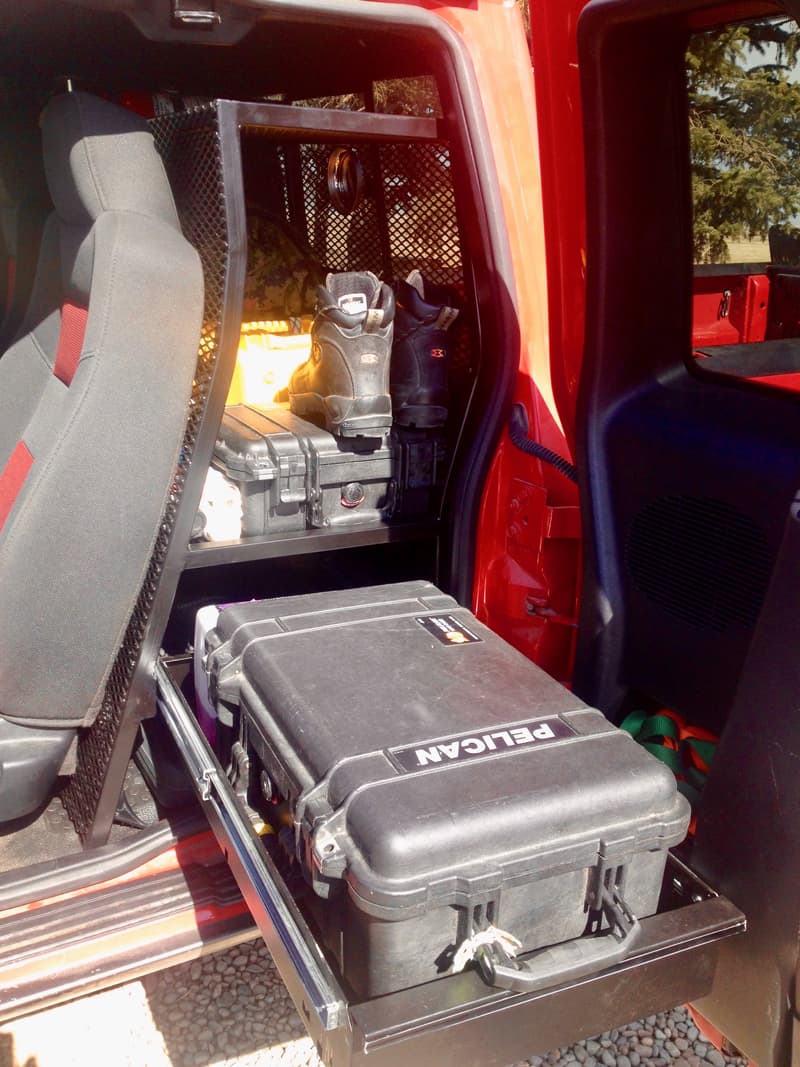
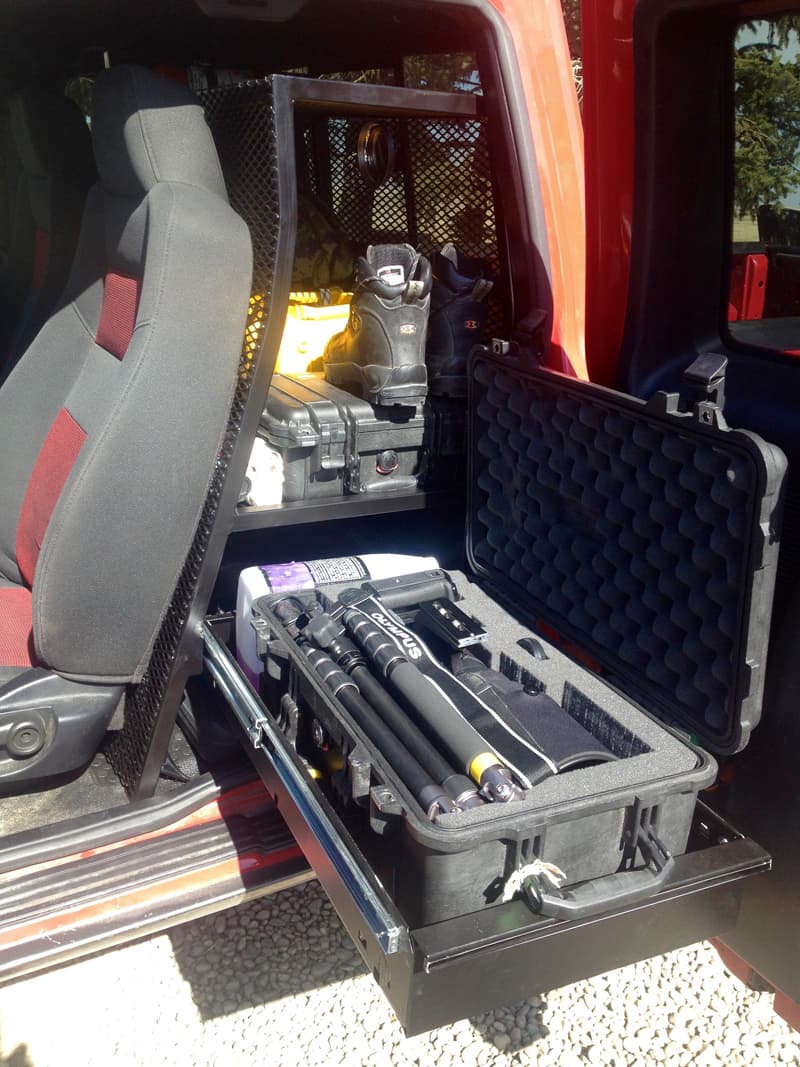
The cage features a pull out drawer from a heavy duty tool box, purposely positioned for rapid access to a camera with a telescopic lens. One shelf above the drawer neatly holds the bulk of the gear. The space on the floor of the cab below the shelf is also utilized, holding a tool set. Even the space above the top is utilized with a fire extinguisher mount.
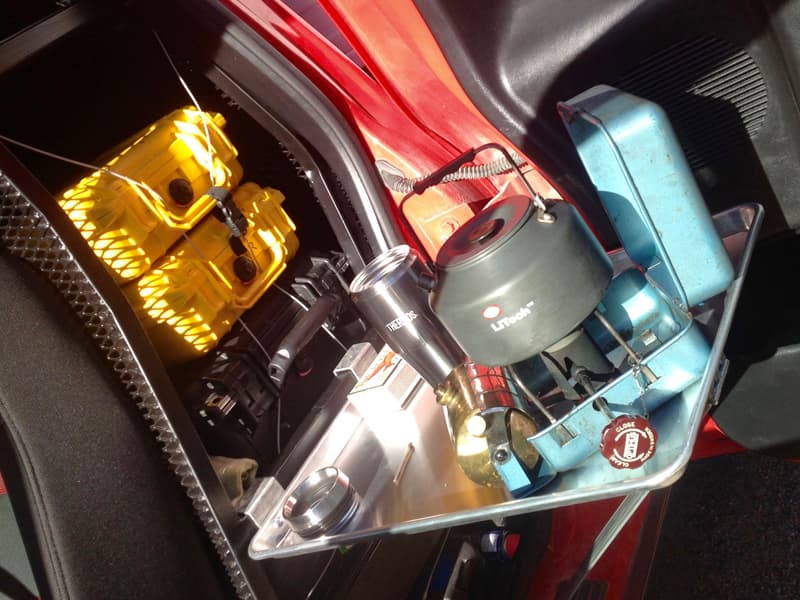
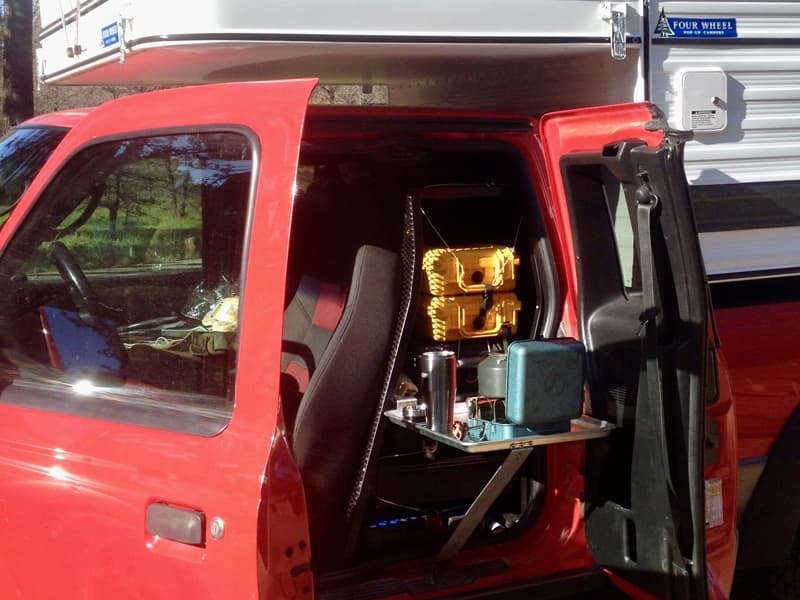
The coup des gras was the portable shelf I made out of a twenty-five dollar cooking sheet from Sears. This sheet fastens onto the cage shelf and extends out of the truck. Now I have a place to boil water and make my tea when I am in the back country.
In hindsight, the one-inch tubing was overkill. Half-inch tubing would be more than enough and I would certainly consider using aluminum in future builds to save weight.
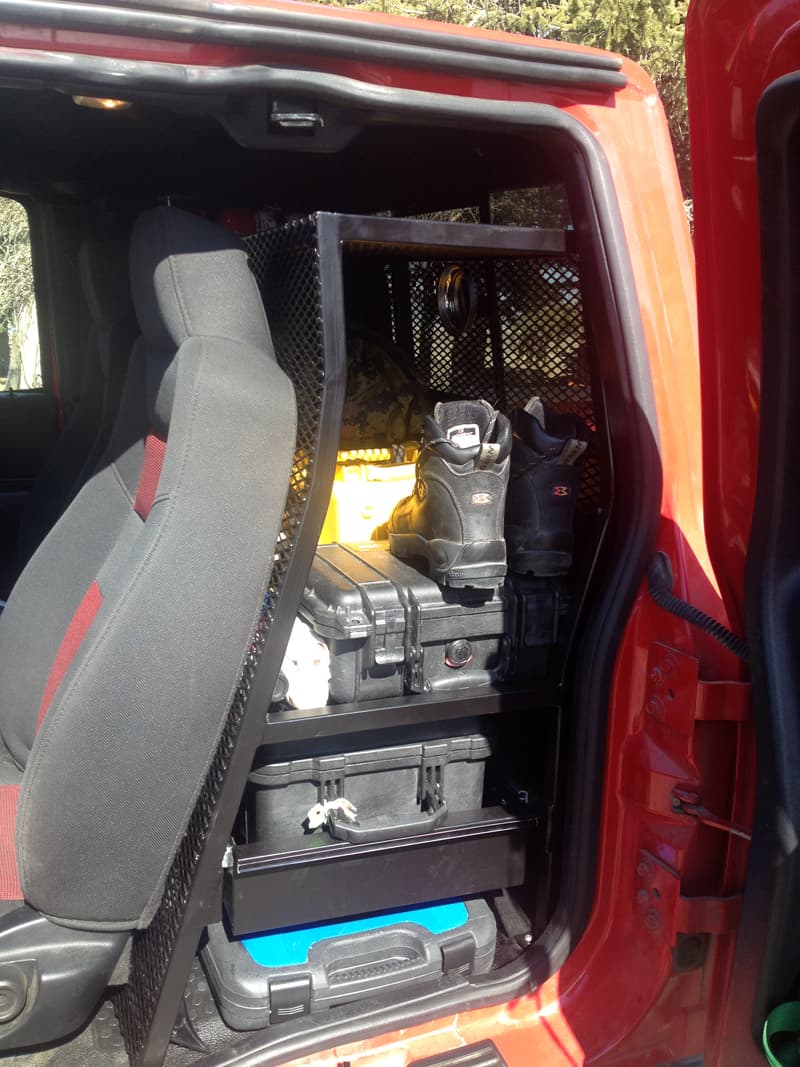
An added and unforeseen bonus was the security aspect that such a cage delivers. I now run a wire lock through the handles of my cases and through the front of the shelf which secures all my camera gear safely in the cage should a thief break into the cab.
Welding the cage puts the modification into the moderate to expert range, but everything else is relatively easy to construct.
The build took approximate 20 hours to complete and materials cost about $300. The drawer was expensive! At the end of the day, the result was a purposely built for housing road safety equipment and rapid access to photography gear, perfect for the minimalist wildlife photographer with a light truck.
7. George Randall, Granby, Massachusetts
Additional Step To Enter Truck
2012 Ford F350
2016 Arctic Fox 865
I am old and have bad knees. A four-wheel drive truck is tall and hard to get into, so I needed a small step.

I took a look around the shop and was able to use scrap steel to build a step. The step bolts to the bottom seam of the rocker panel. An angle brace was extended to the floor pan. A gusset was installed at the angle base to keep the assembly in place and not bend under my advanced weight.


The step has worked out extremely well. It splits the difference from the factory running board to the ground, so it is two steps and you are in. It’s perfect for us older, portly folks.
The project took me a little over an hour. This includes time to get the steel, measuring, and cutting. It cost me just my time because I used scrap steel and bolts from a used bin. In my opinion, the skill level of this modification is easy if you have a torch or a welder.
8. MJ and Keith Pharmer, Scotland, Connecticut
Extra Storage Throughout Camper
2004 GMC Sierra
2014 Northern Lite 10-2
We were preparing for a ten week trip to Alaska. We want to maximize our storage, and still have a clean non-cluttered truck camper.

Under the sink I used command hook to hang dust pan and found a small covered tin to use as a garbage container. I installed two wire bins; one to hold garbage bags and one to keep a dish soap and scrubber.

We took the microwave out and got double duty out of this cabinet. My husband used light weight scrap wood. The shelf has a lip so nothing slides off. Also, all cabinet surfaces are covered with non skid contact paper (not the adhesive stuff).

We have traveled from Newfoundland and to Alaska and we have never lost a knife from this magnetic knife strip. I found it at Walmart.

Organizer pouches are mounted under the cushions to hold maps, books, and an iPad. The boot tray gives more foot wear storage.

Under the dinette seat it was a big open space, so my husband built a frame in the bottom and made a shelf to sit on top getting two levels of storage.

Command hooks are great! We use them in the bathroom for towels and drying space for rain coats.

We get a little more drawer space with this added bin.

In the medicine cabinet I have used plastic organizers that are held in place with elastic fabric tape. There are also non-skid pads underneath.

I found this organizer to fit perfect in the junk drawer giving us two levels of storage.

Plastic bins keep clothing neat and in place. My advice to people is that when you buy a truck camper, you should measure every little space. Keep the measurements on you so that when you go to Walmart, Target or Home Goods, you can find these handy organizers. To us, it made a huge difference living in the camper for two months (along with our 100 pound Chesapeake Bay Retriever).
Another storage addition that is not shown in these pictures is the cargo rack that we put on the front trailer hitch. It is a locking metal box for added storage.
All of these storage upgrades have worked out fabulous!
It took me two hours to complete the storage modifications. They were cheap because the wood items were made with scrap wood. In my opinion, the skill level of this modification was easy. You need an expert for measuring and storage solution shopping.
9. Chuck and Jodie Ramsey, Madison, South Dakota
Added Shelving Unit and Relocated Outlet
2012 Chevy Silverado 3500
2014 Adventurer 116DS
Spending up to seven months at a time in our truck camper, I was tired of the piles that collected on the bedside counter in the cabover section of our camper.
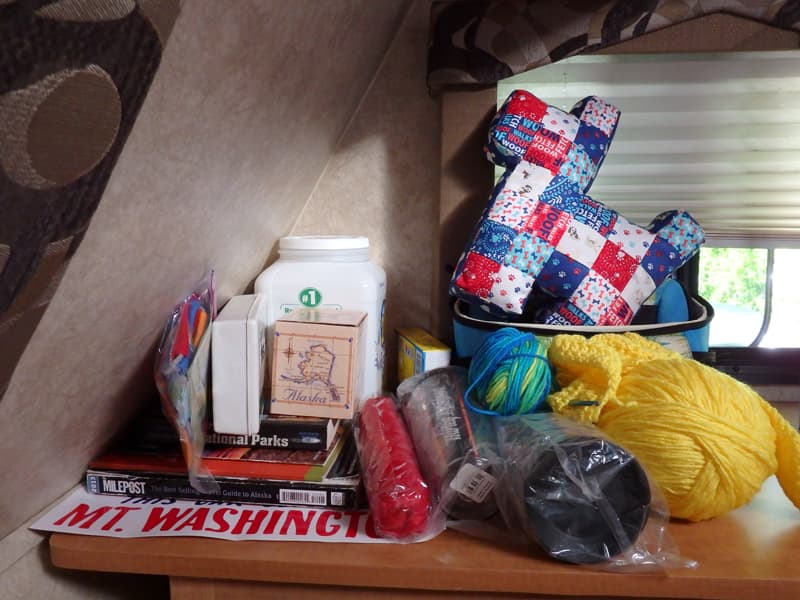
I’d have to dig through the pile to find the hat, camera, pamphlet, laundry supplies, craft projects, souvenirs, or whatever that found its way to the general collection place during the trip. And, if I wanted to open or close the window in that spot, everything had to be moved and then returned.
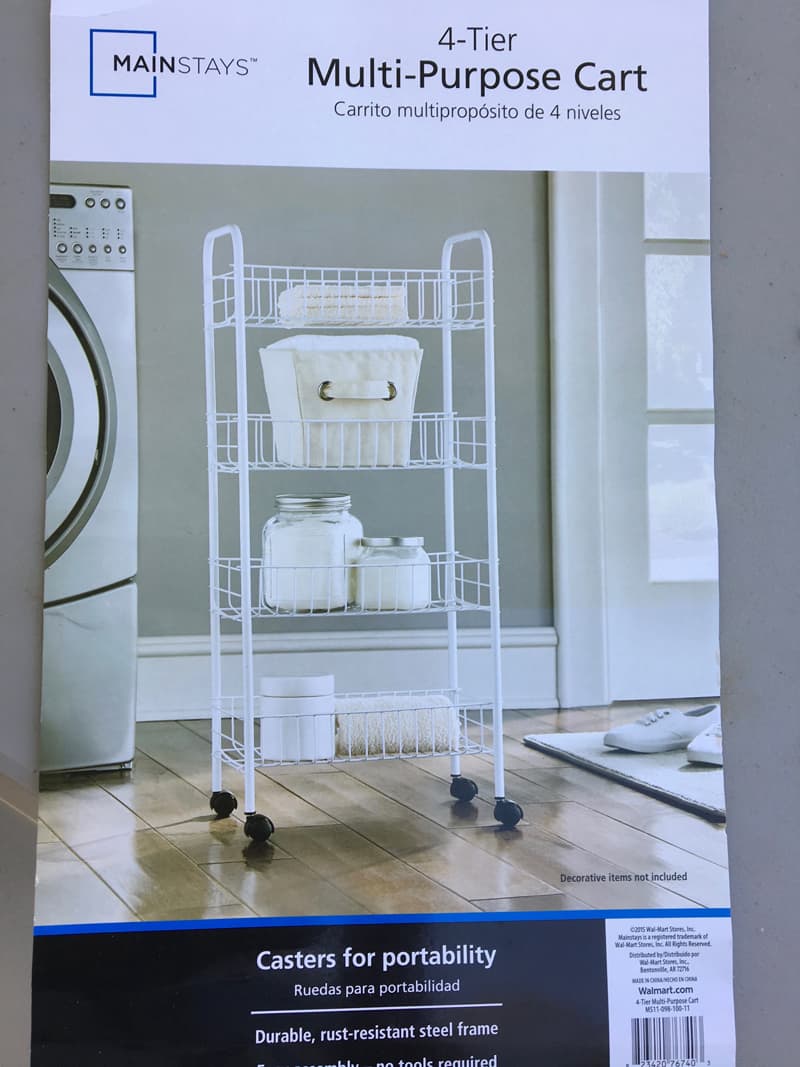
After measuring the available space, the best shelving unit I found only met two of the three dimensions. The problem was that it was too tall and blocked the overhead cabinet door.
We used a reciprocating saw and cut off the bottom section of the shelving legs. This reduced the number of shelves for our use from four to three. We were then able to push the plastic foot pads out of the cut portion and reuse them. The unit came with casters which we did not use.

The shelving unit was fastened to the closet wall and window valance with plastic clips and screws to prevent it from sliding while traveling.
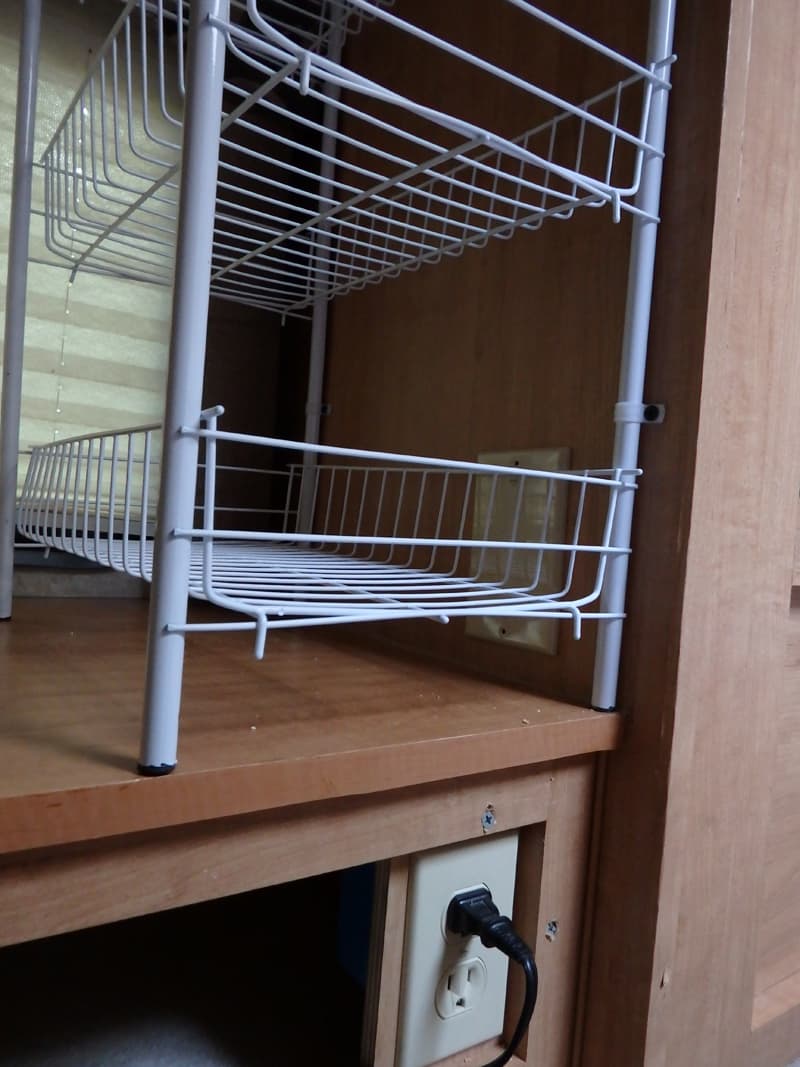
Prior to attaching the shelf in the space, we realized that the one electric outlet in the bedroom was now blocked. Our decision was to relocate the plug to the open area under the bedside counter.
A small board was cut and attached to the open area and a new electric outlet box was installed. The original plug wire was not long enough to reach the new position, so we had to rewire the box. A cover plate was put over the original outlet hole.
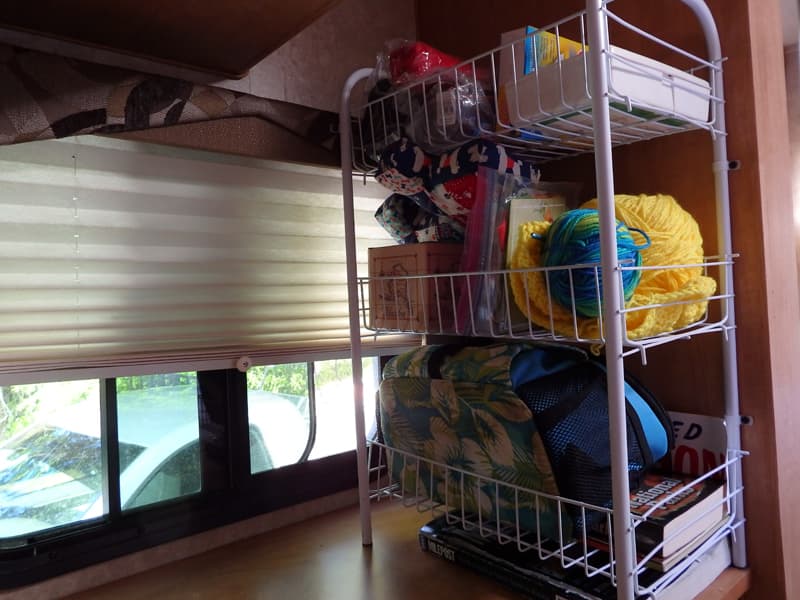
The extra storage this mod created is fantastic! I can easily access the item(s) I want without having to dig for them. We blocked a few inches of the window but, with the wire shelves, sunlight and breeze still pass through easily. Please note that this window is not the emergency exit window. We would not have done this mod if it were.
It took me one hour to complete this modification. The cost of this modification was $30. Half of the expense was for the shelf unit. The other half was for the electric box and wiring. In my opinion, the skill level of this modification is medium because of electrical wiring.
10. Michael Smith, Hondo, Texas
Catio, Cat Patio
2015 Ford F350
2008 Arctic Fox 990
When we decided to do some traveling in a truck camper, we knew that our younger cat, Sandy, would need more room to roam, so we adapted our small cage and a passage into the truck for her.
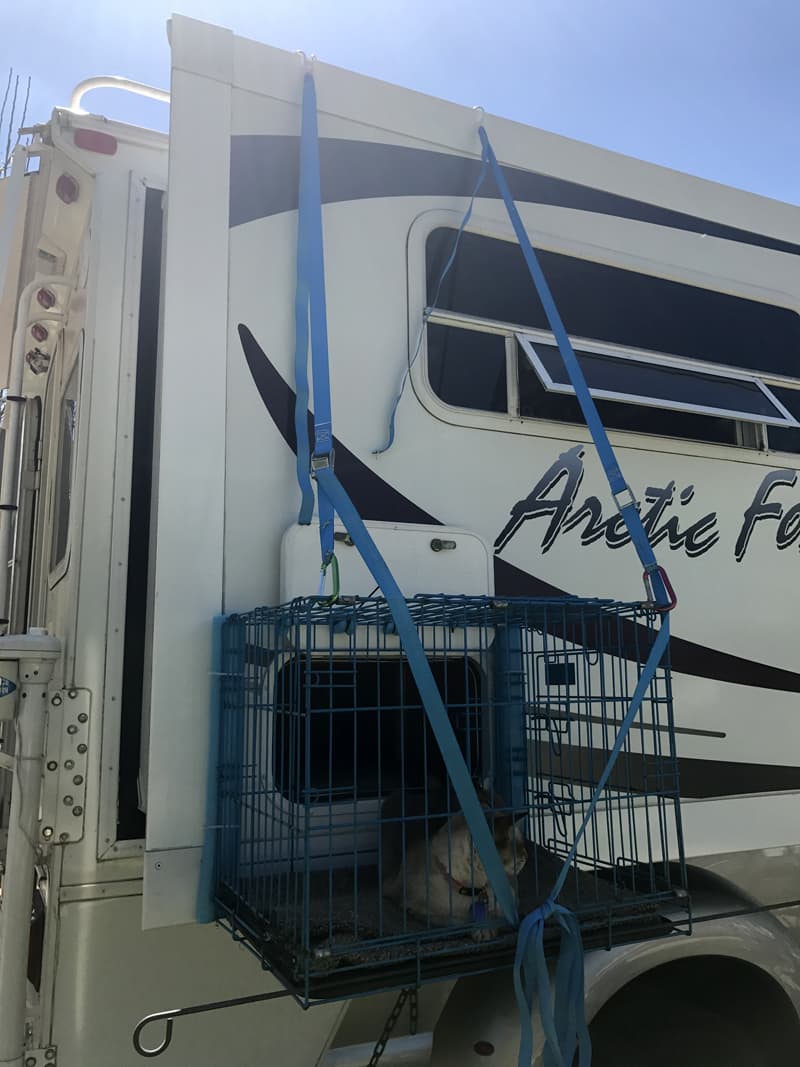
Using our existing cage, I suspended it from the top of the slide with adjustable length straps and secured the bottom of the cage with two C-clamps. Foam padding was added so that we do not to mar the camper finish. This method has no permanent changes or drilled holes in the camper.
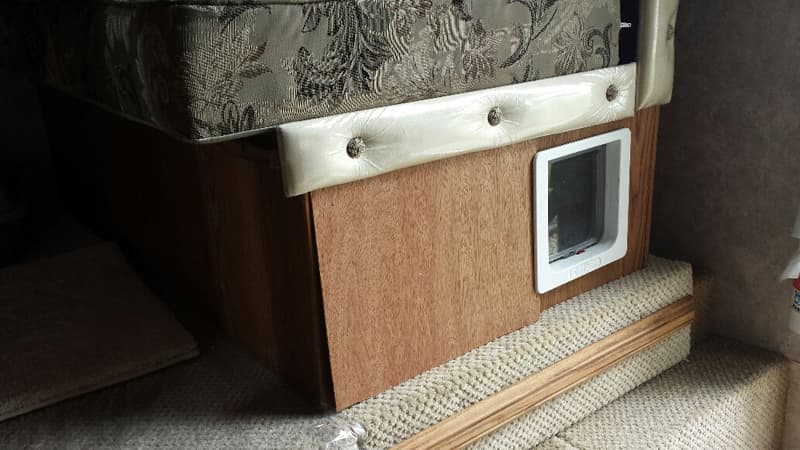
I removed a drawer inside the Arctic Fox and installed our cat door to allow the cats to pass through to the side hatch opening.
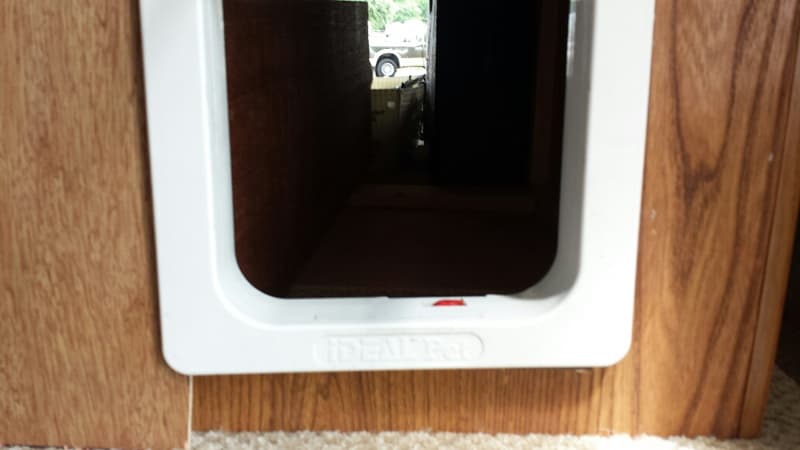
It takes five minutes to install or remove. When I take it off, the camper is returned to its original form.
This has worked well so far. Sandy loves to run from the truck, through the camper and into her “cat-io”. She will often sleep outside, even on chilly nights.
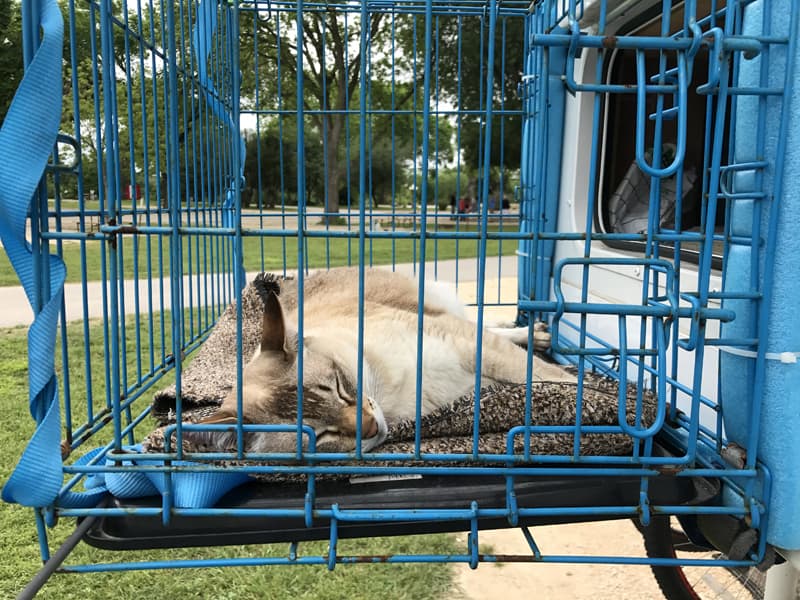
The needed improvements to this mod are (1) a better way to suspend the cage, and (2) a better tunnel from the camper into the cage. Also, rain-proofing the opening.
It took me several hours of thinking, and 45 minutes of actual work. This modification cost me $20 since I used an existing cage and cat door. In my opinion, the skill level of this modification is easy.
Click here to vote for your favorite 3 mods from this month’s contest.
Disclaimer: The modifications above are submitted by Truck Camper Magazine readers. It is your responsibility to make sure that any do-it-yourself modification project you undertake is safe, effective, and legal for your situation.
Enter Your Mods Now!
If you’d like to enter mods into TCM’s Monthly Mod Contest, click here. You can enter as many mods as you want, at any time. Good luck mod makers!
The post July Super Mod Cup Contest: Medium Mods appeared first on Truck Camper Magazine.