PVC pipe has been cut, 10-gauge wire wrestled, fantastic fans flipped open, closets pulled apart, and more. Is this madness run amok, or mod contest winning?

Welcome to the March 2016 Monthly Mod Contest. Please review the following twelve Medium Mods and vote for your favorite. We will announce the March 2016 Mod Contest winner next week. For more information about the Monthly Mod Contest, including how to enter, click here.
Click here to vote for your favorite 3 mods from this month’s contest.
March 2016 Mod Contest Entries:
1. David Carvalho, South Hadley, Massachusetts
2006 Ram 3500
2013 Alaskan camper
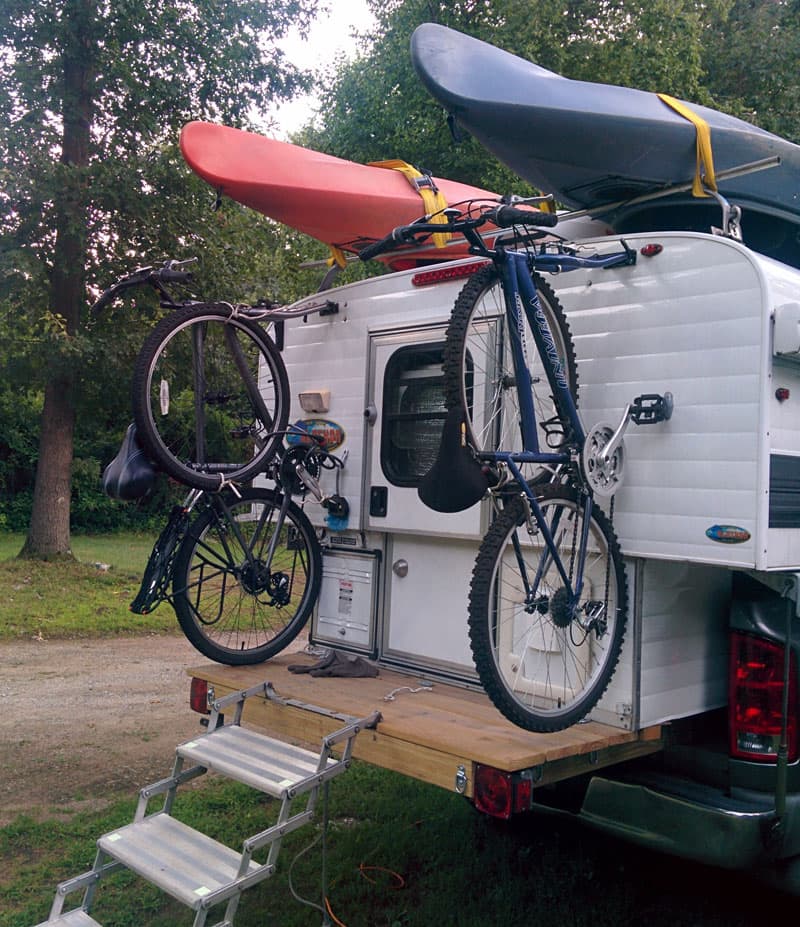
I carry two full size bikes without having to have a hitch mounted carrier or put my bikes inside. I installed bike fork mounts to the rear of the camper. I can safely carry two bikes on the back of the camper without the use of a hitch-mounted bike carrier.
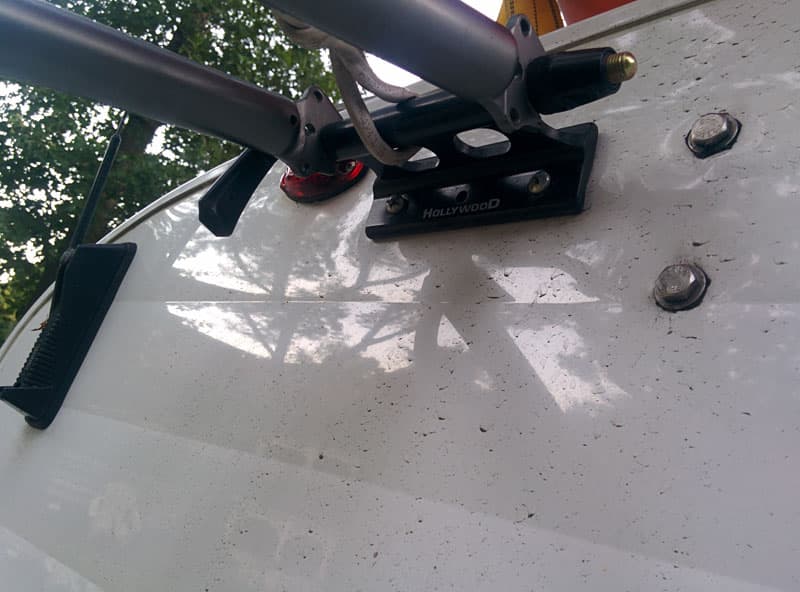
The bikes ride up high on the camper, one on each side. I can still enter the camper with the bikes mounted. I can also raise and lower camper without removing bikes.
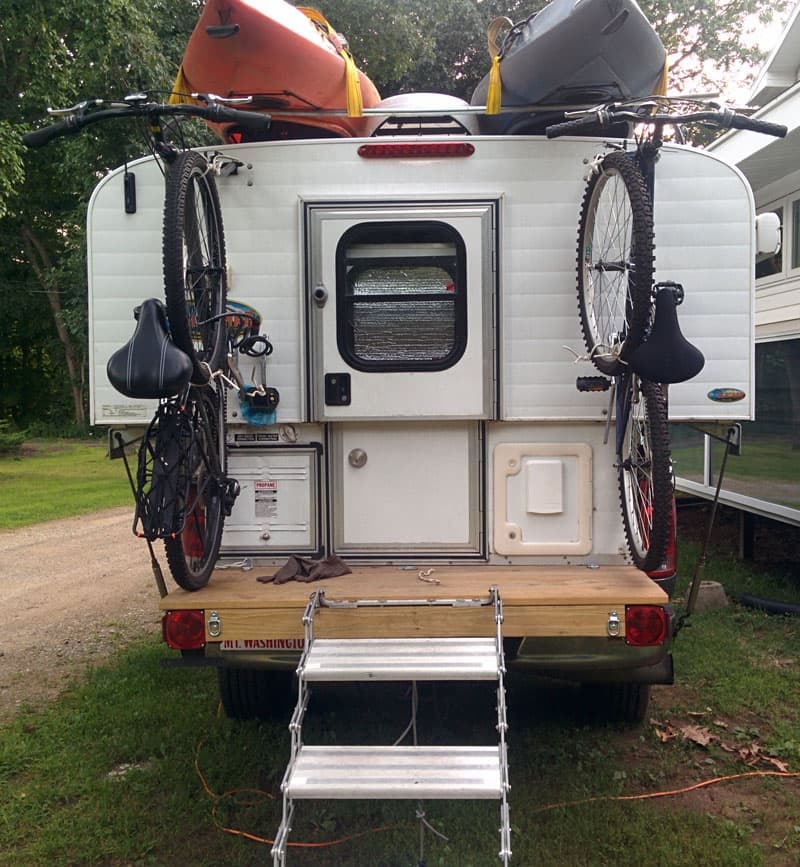
Mounted this way, the bikes don’t get all the bugs or road grime. An expensive swing away carrier is not required. The bikes are easy to load from the stairs or platform.
It took me one hour to complete and cost $50. In my opinion, the skill level of this mod is easy to medium.
2. Russell and Gretchen Berquam, Livingston,Texas
2014 Ford F350
2015 Arctic Fox 1140
Campers never have enough storage in the kitchen, so we added some counter top storage in the kitchen and a toothbrush holder in the bathroom.
In the kitchen, we are able to keep the large cooking utensils on the counter, even when we are driving down the road. Since the utensil holder would never stay in place in motion down the highway, I fastened it to the counter top.

I mounted a post in the countertop 3/4-inch high and 5/16-inch in diameter. I used a wood screw with a long nut for the post, but a short piece of tubing would also work.
Next, I drilled a hole in the utensil holder the same size as the post on the counter top. I slide the holder down over the stud and fill with spatulas, spoons, scrapers, or whatever. The holder is easily removable for counter cleaning. Since the hole in the utensil holder is a snug fit on the stud, it stays in place even on the roughest roads.
The pictured holder was turned on my lathe, but I have made several holders with 3-inch or 4-inch PVC pipe with wooden and plastic bottoms. I painted the plastic holders to match the decor of the kitchen.
The bathroom holder was made from 3-inch PVC and I used a smaller post. I cut off the head of a wood screw and used that for the post. The post is about ⅛-inch in diameter and works great. I think that it would work fine even on the larger kitchen utensil holder as long as the holder has a fairly thick bottom. I drilled the hole in the bottom of the holder off center to allow for adjustment on the countertop.

The bathroom toothbrush holder was made with the PVC pipe, but a flat bottom plastic glass with a thick bottom may work also. We wouldn’t be without our utensil holders.
It took me one hour to complete and cost $2. In my opinion, the skill level of this mod is medium.
3. Jesse Taylor, York, Pennsylvania
2006 GMC Sierra 2500 HD 4×4
2005 Lance 815
I needed a way to haul my large 3500 watt generator, but not advertise its location for the world to see. I had already installed a front hitch on the truck that I used for hauling three Rubbermaid tubs of firewood, kindling, and charcoal grilling gear. As transporting firewood is a big no-no today, I put the hitch to a better use.

As the plastic storage box had a recessed lid, I cut a piece of scrap plywood that would support the generator and fill the gap that existed between the cargo rack and lid when turned upside down. This plywood was bolted to the rack and plastic lid screwed to the plywood. The storage box lid is now the bottom of my new generator box.
I cut two strap slots for the strap that hold the generator in place on the rack using ratchet straps. I previously made a 10-foot anti-theft plastic coated cable with end loops and a padlock which I ran around the truck bumper and through the generator.
I installed the driveway snow plow guides. The box was below the hood of the truck and invisible to any driver in the truck. I used rubber coated electrical wire holders and bolted the guides to the outer front corners of the cargo rack to remind me how far I was extended in front and to not knock over anyone in crosswalks.

The plastic box bottom (now a very deep lid) is held in place by spare ropes that I had on hand as I travel down the road on my adventures.
I made the weather proof box this way because:
1. I only have to lift the generator about 20 inches from the ground instead of close to 40 inches if the Sterilite box was upright.
2. As the camper power cord reaches the generator, I have no reason to lift it on/off/on again on trips.
3. If I did take it off the cargo carrier and put near the camper, the plastic coated cable could secure it to a large tree.
4. If it starts to rain during camping use, I turn it off and drop the bottom, I mean large deep lid, over it.
5. I am way to cheap to get one of the fancy aluminum lock boxes that invites bad guys to take a special interest in investigating this bright strongbox of goodies.
The front cargo carrier from Harbor Freight about $60. The receiver on the front of truck was previously purchased years ago. The Sterilite box was from Walmart for about $15. Plywood, bolts, screws, strapping, ropes, and a plastic coated cable and lock were borrowed from my canoe gear. The driveway plow guides were from Tractor Supply for $3 each. The rubber coated electric cable holders were from Lowes for about 25 cents each.
It took me two hours hours to complete and cost approximately $75. In my opinion, the skill level of this mod is easy.
4. Dewey Lackey, Brentwood, Tennessee
2003 Chevy Silverado 3500
2014 Lance 1172
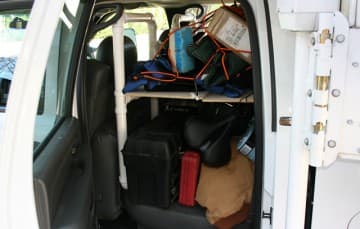
I made a modification to the back seat area of our crew cab truck. The decision to make this addition came as a means to organize the items that we carry on our camping trips with our 2014 Lance 1172.
 |
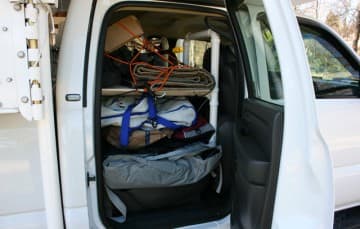 |
Now, instead of having the back seat piled up even with the top of the front seats, we can put everything in the truck in an orderly fashion. We will put the larger, heavier items – tool boxes, portable jump start kit, and inflatable kayak – in the bottom area and the lighter items – jackets, rain gear, soft side cooler with beverages and food for travel, additional lawn chairs – in the top area. All of these items will be secured by a 4-foot by 6-foot stretchable cargo net.
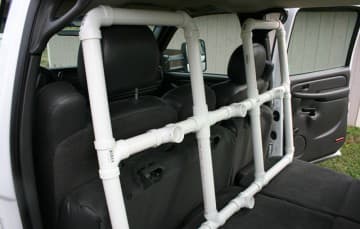
I made the front section of the rack to extend upwards even with the top of the head rests of the front seat to prevent anything from shifting forward in a sudden stop. This approach also compliments the cargo net (ordered but not yet received).
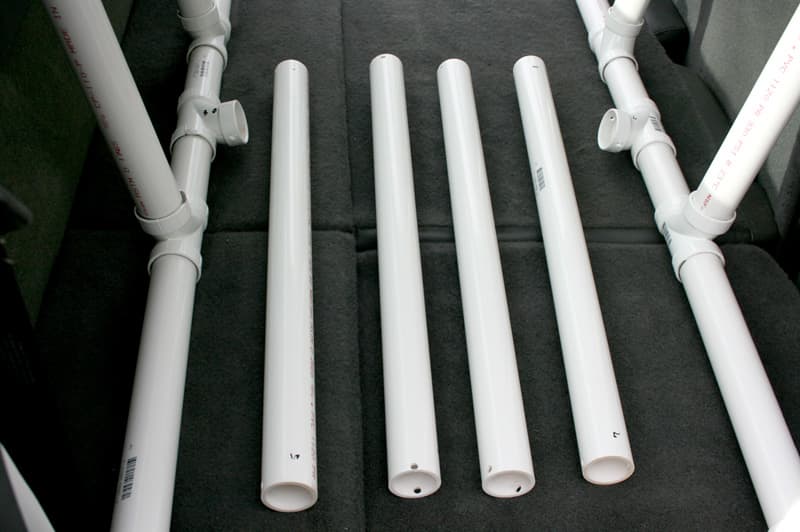
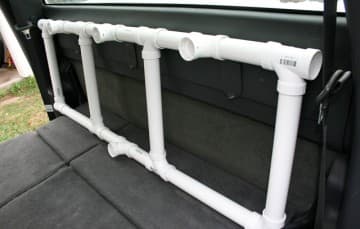
The rack is constructed from 1½-inch PVC pipe, with tees and elbows. The front and rear portions are permanently glued together with PVC glue.
 |
 |
After placing the front and rear sections in the truck, I then add the cross members and secure them with ¼-inch bolts. ¼-inch spring pins will work as well.
Then, I added the ⅜-inch plywood shelf, which is notched in the front to prevent shifting in transit. The shelf is hinged to facilitate getting it into the truck. This shelf can also be attached to the framework by drilling holes in the plywood and using tie wraps.
The cost of this project, including the cargo net, is about $125.00. In my opinion, the skill level of this mod is medium.
5. Bob Meigs, Huntington Beach, California
2011 Dodge Ram 1500 Bighorn
2012 Four Wheel Camper Raven

I wanted a permanent grey water storage for my Four Wheel Camper Raven pop-up camper. Since I already had dead space over my wheel wells, that was the likely place for an onboard storage tank.
 |
 |
This mod is pretty straight forward, 4-inch ABS drain pipe, cut to fit the length of my truck bed and leaving enough room for end caps, fittings, etc. It is mounted at an angle so the water flows to the drain valve at the rear of the camper.
 |
 |
 |
 |
I used hose clamps to keep the pipe tight to the truck. This makes it easier to put the camper back on. I used four adhesives; ABS, PVC, silicon caulk, and a special ABS/PVC adhesive for where you bond PVC to the ABS. I got all of the adhesives at Home Depot. The silicon caulk was to adhere a vent tube on the high end so air can escape to displace the entering water.

This modification works great. The tank holds 3.5 gallons on a short bed truck. If I exceed the 3.5 gallon due to long stays, I can drain into a bag or bucket. Once I’m on the road, I typically stop near a curb drain and open the valve. The best part is that I can now use the sink anytime without any setup.

The mod took me about two hours, since I had to take the camper off the truck, and cost $25. In my opinion, the skill level of this mod is medium.

6. Drew DeBois, Tigard, Oregon
2004 Dodge Ram
2011 Northern Lite

The factory bump stops (where the camper meets the front of the pickup bed) provided limited surface area to stabilize the camper and they conflicted with my Happijac mount system. This, in turn, set the center of gravity slightly aft of the rear axle and affected the handling of my rig.

I installed a 1-inch by 4-inch by 5-foot long section of oak-ledger board against the front of the bed of the truck directly above the Happijac spreader bar. Then, I installed two 2-inch by 2-inch by 14-inch rubber bump stops to the oak ledger. This type of bump stop is normally seen on the back of small delivery vehicles and/or loading docks. It provides much more surface area for the camper to rest against, as well as additional stability.
The mod has worked flawlessly. It took me less than an hour from start to finish and cost approximately $25. In my opinion, the skill level of this mod is easy.
7. Roy Bertalotto, Dartmouth, Massachusetts
2006 Dodge 2500
1998 Palomino Bronco 1200
I wanted to add a solar panel to the roof of my Palomino Bronco pop-up truck camper. Mounting the panel and wiring the controller to the battery has been covered many, many times, but a pop-up presented a unique problem.
How do you get the wire from the roof to the battery compartment? It is a very heavy, stiff wire (10 gauge) and I wanted it to look nice and neat. I needed to construct some type of collapsing tube that the wire would run into as the top was folded down.

 |
 |
Using a couple pieces of PVC tubing that fit within each other, and a couple of plumbing accessories, I accomplished exactly what I wanted.
One tube is mounted to the ceiling of the camper and the other directly behind the sink, attached to the counter top. A couple trim rings finish it off.

As the top folds down, the two tubes retract and the wire is guided into the area under the sink where all the other wiring, fuse panel, etc., reside.

This mod gets the most positive comments of all the modifications I’ve made. It works perfectly, and looks nice and neat.
It took me three hours to complete and cost $25. In my opinion, the skill level of this mod is medium.
8. Duncan Crawford, Westminster, Maryland
2008 Ford F450
2015 Northstar 12STC

I needed a handy place for oversize cooking utensils where they could live going down the road and not dump on the floor. We have too many tools to fit in the drawer space below the counter, and the plastic drawer unit we added in the cabinet above doesn’t have drawers quite deep enough. Note that the picture shows the full load. On short trips some might be left home or stored elsewhere.

I designed and built a countertop box sized to fit behind the stove. The width allows it to be captured between the raised counter and window frame, while an enlarged base captures it between wall and stove and prevents tipping – unless the camper angle exceeds about 45 degrees.

I designed it in CorelDraw and cut it from ⅛-inch Baltic birch on my laser engraver. The decorative pattern is vector-cut through the material. The finish is blonde shellac.
While every tab is glued, I added some clear epoxy on the inside/top of each corner to ensure – on bumpy roads – the full utensil load wouldn’t result in joints coming apart.
It hasn’t moved in several thousand miles, and everything is at hand. Fortunately we have not tested the extreme camper angle anti-tip feature.
It took me three hours to complete and cost $6 for materials. In my opinion, the skill level of this mod is hard if you don’t already have the tools. If you already have the tools, it’s easy.
9. Scott Roberts, Isanti, Minnesota
2015 Dodge Ram 3500
1995 Hallmark Cuchara

I do a lot of early season bird hunting, run multiple dogs, and needed a way to get them all watered. Filling water bowls with the outside shower or carrying a large container of water is a pain, especially since I already have a large source of water in my camper.
I started by just wanting to get rid of the borderline useless sink in the bathroom and replace the counter top. When I got it all taken apart, I realized that I had extra water lines and that I could use them to solve the problem I’ve always had when I’m out hunting of giving water to my dogs.
 |
 |
I removed the counter top with the sink and faucet and, while I had it off, I ran a water line to the back of the camper tying it into a hose bib. I caulked all penetrations with silicone and put in the new countertop. The new countertop in the bathrooms got me thinking of a total remodel.

I haven’t got a chance to use it yet, but I am sure it will be invaluable as one of the places I’m going tends to be warm early in the season and lacks running water.
It took me four hours to complete and cost $20. In my opinion, the skill level of this mod is medium.
10. Bill Harr, Stockton, California
2005 Toyota Tundra
2013 Hawk shell custom build interior
The Fantastic Fan I have has three speeds; fast, faster, and fastest. It also uses resistors to control the speed, so you are actually not saving the battery running at a slower speed.

I purchased a PWM DC motor speed regulator controller off of eBay. Most are under $10. The first one I got had a high frequency noise. Get one over 20 kHz and you will be okay. Harv on Wander The West sent me a second one that I used.

You need to identify the hot and ground wires going to the fan. Redirect them to the controller. Both the positive and negative must got through the controller and out to the fans forward and reverse switch. I drilled a hole for the speed control dial and hot glued the controller in place.
It’s a great fan can now be turned down and is very quiet.
It took me less than two hours hours to complete and cost under $10. In my opinion, the skill level of this mod is hard.
11. Rick Bauman, Santa Rosa, California
2003 Ford F350
1999 Elkhorn 11X

I didn’t need a closet. I needed a pantry. So, I changed a closet into a pantry. I had wire shelves in a cabinet I didn’t need, so I took them apart.

I made a wooden frame to fit the width of the wire shelves. I stained the wood to match, and put the tracks on the frame.
 |
 |
It works fantastic. You can pull out shelves to reach to the back of them.
It took me about four hours hours to complete and cost $15. In my opinion, the skill level of this mod is medium.
12. Mike and Kellie Nyholm, Forestville, California
2008 GMC 3500
2015 Host Mammoth
The typical center mounted radio/DVD player/entertainment unit mounted in a center panel of a three panel frame begged the question, “What is behind these two blanks”?

I removed the stereo unit and looked behind blank covers by pounding out the stapled flat veneer panels. I salvaged the style to divide the areas into two. I essentially moved the stereo unit to the far right allowing me to create a matching boxed area. I also found the inverter and a spare outlet close by. That area now shelves phones, chargers, and other electronics that can run from an additional receptacle off the inverter.

I never have to utter the words cord management with phone chargers and toasters again.
It took four hours to complete and I had and the parts on hand. In my opinion, the skill level of this mod is hard.
Click here to vote for your favorite 3 mods from this month’s contest.
Disclaimer: The modifications above are submitted by Truck Camper Magazine readers. It is your responsibility to make sure that any do-it-yourself modification project you undertake is safe, effective, and legal for your situation.
Enter Your Mods Now!
If you’d like to enter mods into TCM’s Monthly Mod Contest, click here. You can enter as many mods as you want, at any time. Good luck mod makers!
The post March Mod Contest: Medium Mods appeared first on Truck Camper Magazine.